Prompt management
Opik provides a prompt library that you can use to manage your prompts. Storing prompts in a library allows you to version them, reuse them across projects, and manage them in a central location.
Using a prompt library does not mean you can’t store your prompt in code, we have designed the prompt library to work seamlessly with your existing prompt files while providing the benefits of a central prompt library.
Opik supports two types of prompts:
- Text Prompts: Simple string-based prompts with variable substitution
- Chat Prompts: Structured message-based prompts in OpenAI format for conversational AI applications, supporting multimodal content (text, images, videos)
Text Prompts
Text prompts are simple string-based templates that support variable substitution. They are ideal for single-turn interactions or when you need to generate a single piece of text.
Managing text prompts stored in code
The recommended way to create and manage text prompts is using the
Prompt
object. This will allow you to continue versioning your prompts in code while
also getting the benefit of having prompt versions managed in the Opik platform
so you can more easily keep track of your progress.
Prompts stored in code variables
Python
TypeScript
Prompts stored in files
Prompts can also be stored in a file and loaded from it:
Python
TypeScript
The prompt will now be stored in the library and versioned:

The Prompt
object will create a new prompt in the library if this prompt doesn’t already exist,
otherwise it will return the existing prompt.
This means you can safely run the above code multiple times without creating duplicate prompts.
Using the low level SDK for text prompts
If you would rather keep text prompts in the Opik platform and manually update / download them, you can use the low-level Python SDK to manage your prompts.
When to use client methods vs. classes:
-
Use
Prompt()class (recommended): For most use cases, this class automatically uses the global Opik configuration set byopik.configure(). -
Use
client.create_prompt(): When you need to use a specific client configuration that differs from the global configuration (e.g., different workspace, host, or API key).
Creating text prompts
You can create a new prompt in the library using both the SDK and the UI:
Python SDK
TypeScript SDK
Using the UI
Adding prompts to traces and spans
You can associate prompts with your traces and spans using the opik_context module. This is useful when you want to track which prompts were used during the execution of your functions:
Adding prompts to traces
Adding prompts to spans
Combined usage
You can view the prompts associated with a trace or span in the Opik UI:
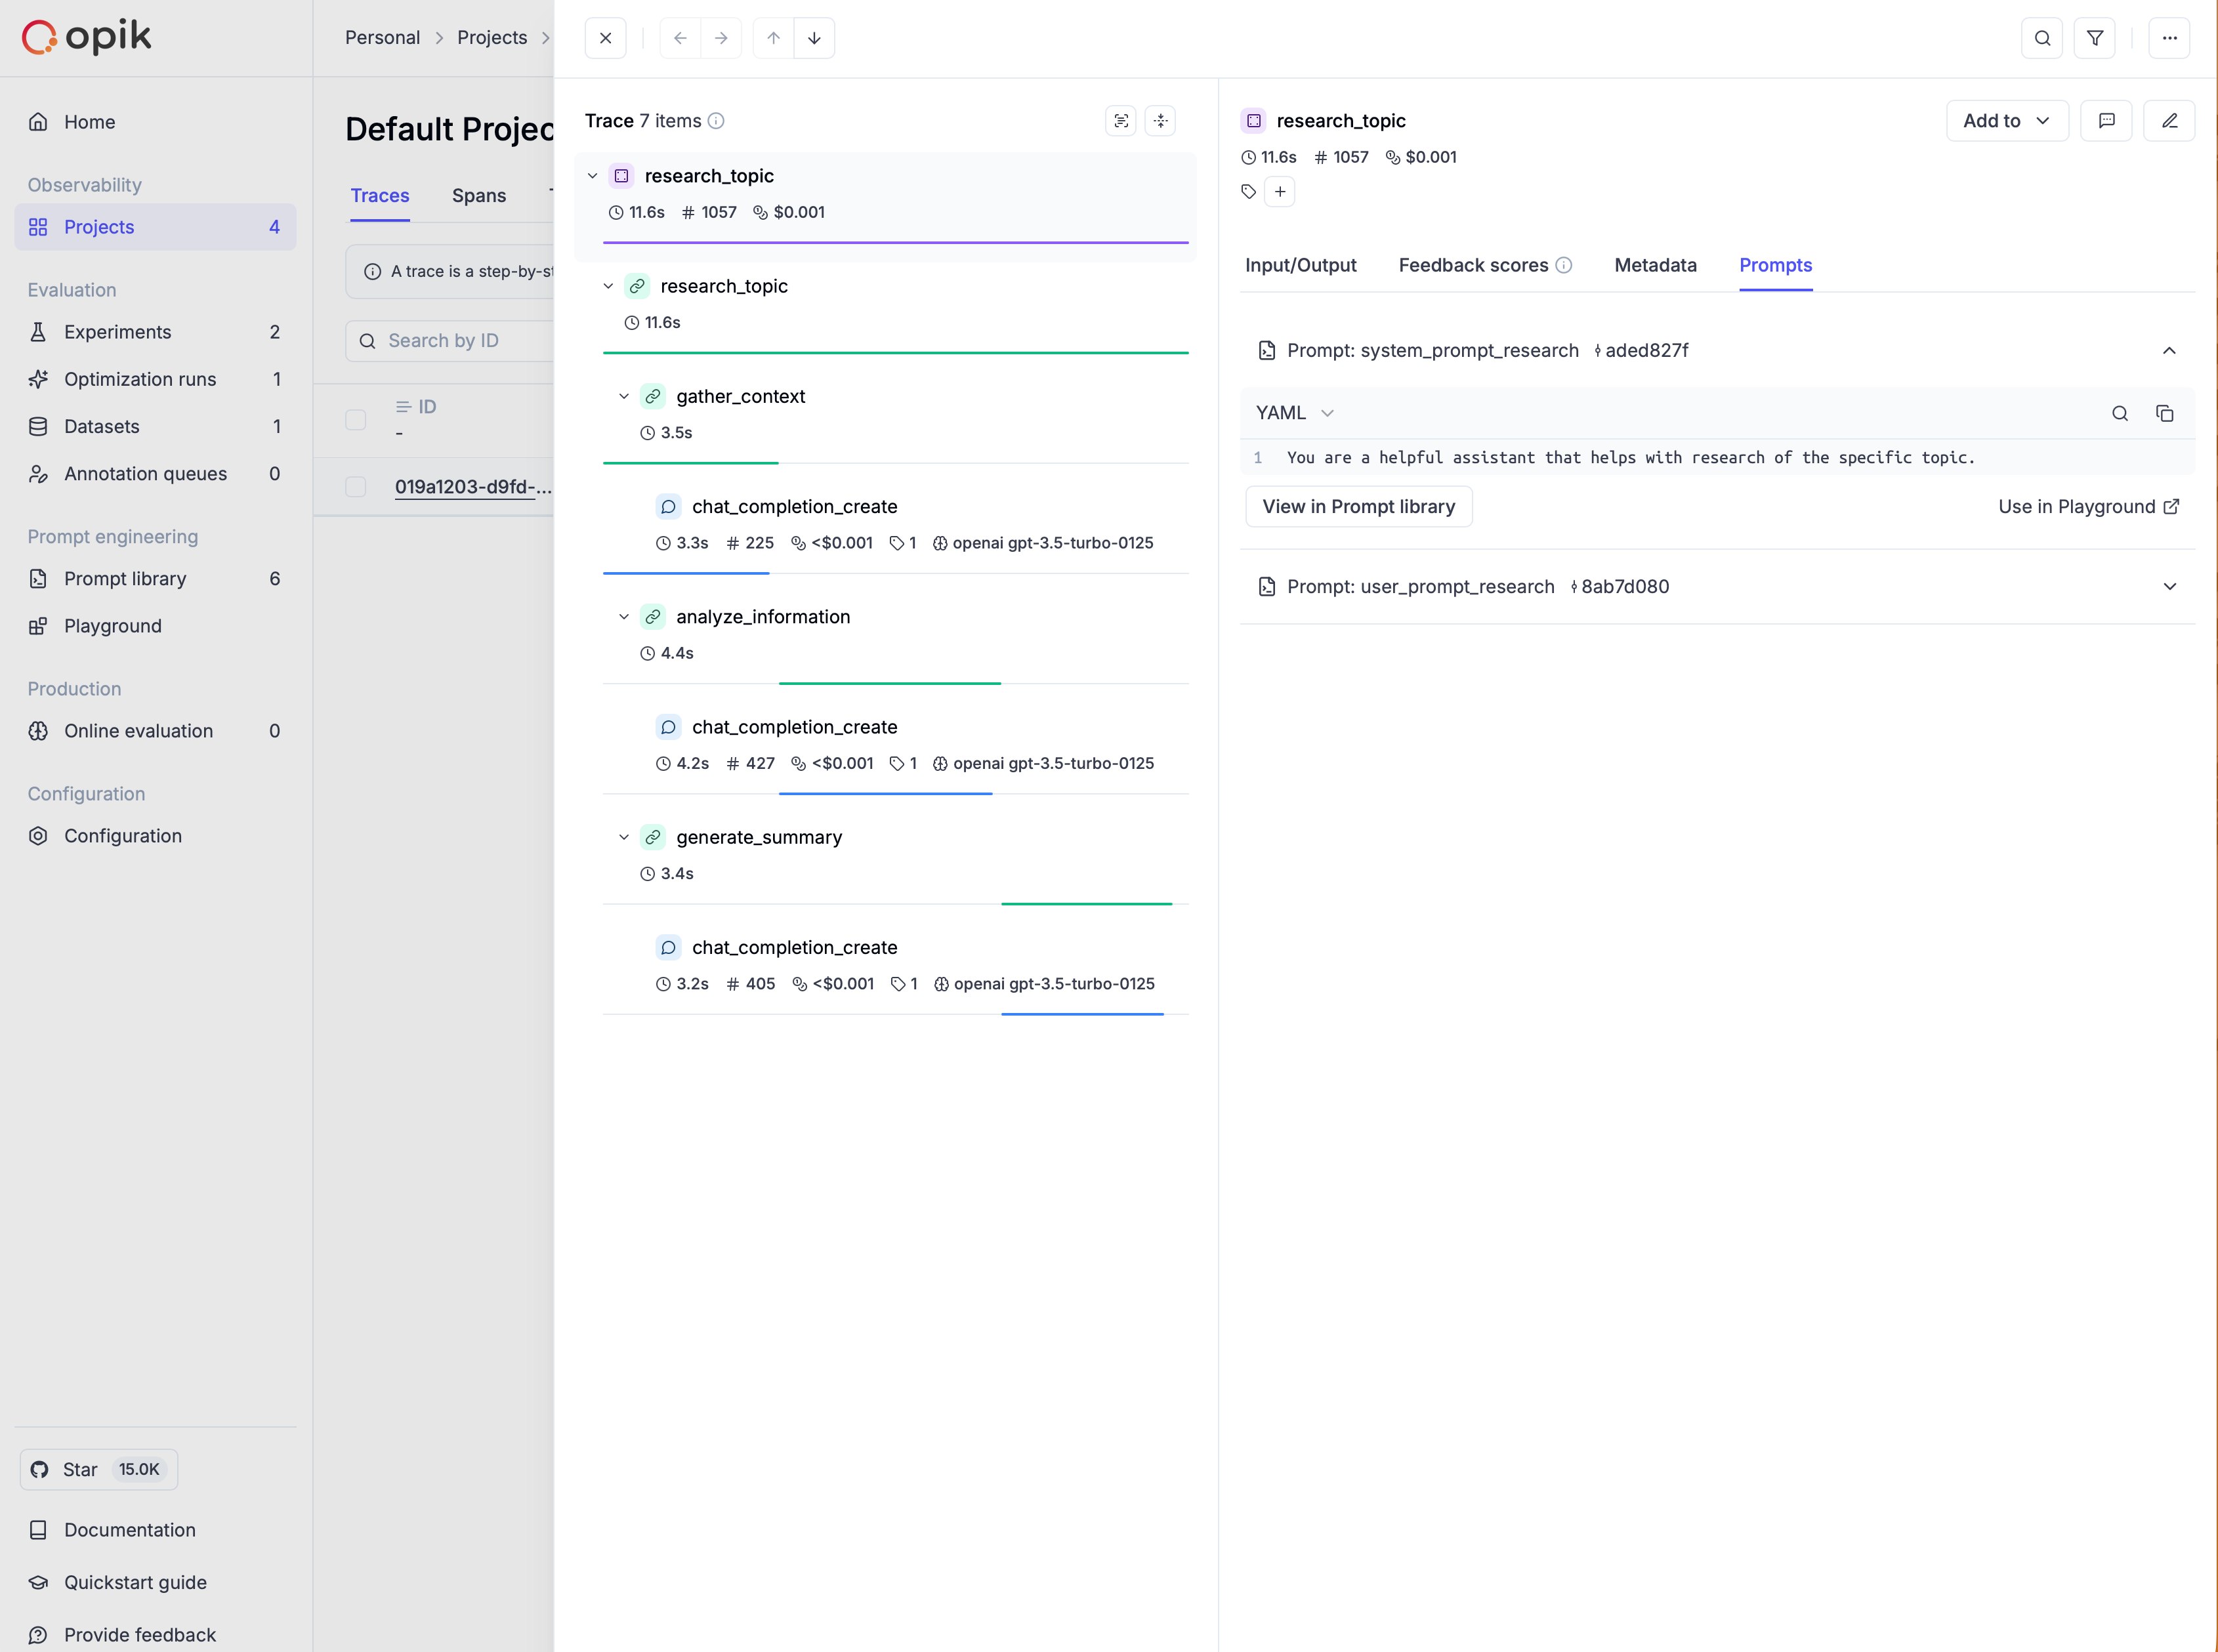
Further details on using prompts from the Prompt library are provided in the following sections.
Using prompts in supported integrations
Prompts can be used in all supported third-party integrations by attaching them to traces and spans through the opik_context module.
For instance, you can use prompts with the Google ADK integration, as shown in the example here.
Downloading your text prompts
Once a prompt is created in the library, you can download it in code:
Python
TypeScript
Use the Opik.get_prompt method:
If you are not using the SDK, you can download a prompt by using the REST API.
Searching prompts
To discover prompts by name substring and/or filters, use search_prompts. Filters are written in Opik Query Language (OQL):
Python
TypeScript
Use search_prompts:
You can filter by template_structure to search for only text prompts ("text") or only chat prompts ("chat"). Without the filter, search_prompts returns both types.
The filter_string parameter uses Opik Query Language (OQL) with the format:
"<COLUMN> <OPERATOR> <VALUE> [AND <COLUMN> <OPERATOR> <VALUE>]*"
Supported columns for prompts:
Examples:
tags contains "production"- Filter by tagname contains "summary"- Filter by name substringcreated_by = "user@example.com"- Filter by creatortags contains "alpha" AND tags contains "beta"- Multiple tag filteringtemplate_structure = "text"- Filter for only text promptstemplate_structure = "chat"- Filter for only chat prompts
search_prompts returns the latest version for each matching prompt.
Chat Prompts
Chat prompts are structured message-based templates designed for conversational AI applications. They support multiple message roles (system, user, assistant) and multimodal content including text, images, and videos.
Key Features
- Structured Messages: Organize prompts as a list of messages with roles (system, user, assistant)
- Multimodal Support: Include images, videos, and text in the same prompt
- Variable Substitution: Use Mustache (
{{variable}}) or Jinja2 syntax - Version Control: Automatic versioning when messages change
- Template Validation: Optional validation of template placeholders
Managing chat prompts stored in code
Similar to text prompts, you can create and manage chat prompts using the
ChatPrompt
class. This allows you to version your chat prompts in code while benefiting from
centralized management in the Opik platform.
Simple chat prompt
Python
TypeScript
Using chat prompts with OpenAI
Chat prompts work seamlessly with OpenAI’s chat completion API:
Python
TypeScript
Multi-turn conversation templates
You can create templates for multi-turn conversations:
Python
TypeScript
The chat prompt will now be stored in the library and versioned, just like text prompts.
The ChatPrompt
class will create a new chat prompt in the library if it doesn’t already exist,
otherwise it will return the existing prompt.
This means you can safely run the code multiple times without creating duplicate prompts.
Once created, you can view and manage your chat prompts in the Opik UI:

Multimodal chat prompts
Chat prompts support multimodal content, allowing you to include images and videos alongside text. This is useful for vision-enabled models.
Image analysis
Python
TypeScript
Video analysis
Chat prompts can also include video content:
Python
TypeScript
Mixed content
You can combine multiple types of content in a single message:
Python
TypeScript
When formatting multimodal prompts, you can specify supported_modalities to control how content is rendered:
- If a modality is supported (e.g.,
{"vision": True}), the structured content is preserved - If a modality is not supported, it’s replaced with text placeholders (e.g.,
<<<image>>><<</image>>>)
This allows you to use the same prompt template with different models that may or may not support certain modalities.
Using the low level SDK for chat prompts
You can also use the low-level Python SDK to create and manage chat prompts directly.
When to use client methods vs. classes:
-
Use
ChatPrompt()orPrompt()classes (recommended): For most use cases, these classes automatically use the global Opik configuration set byopik.configure(). -
Use
client.create_chat_prompt()orclient.create_prompt(): When you need to use a specific client configuration that differs from the global configuration (e.g., different workspace, host, or API key).
Creating chat prompts
Python SDK
TypeScript SDK
Using the UI
Use Opik.create_chat_prompt to create a chat prompt:
Downloading chat prompts
Once a chat prompt is created in the library, you can download it in code:
Python
TypeScript
Use the Opik.get_chat_prompt method:
Searching chat prompts
You can search for chat prompts specifically by using the template_structure filter:
Python
TypeScript
Use Opik.search_prompts with the filter:
To search for text prompts only, use template_structure = "text". Without the filter, search_prompts returns both text and chat prompts.
The filter_string parameter uses Opik Query Language (OQL) and supports the same columns and operators as text prompts (see Searching prompts above).
Template types for chat prompts
Chat prompts support two template types for variable substitution.
Mustache (default)
Python
TypeScript
Jinja2
For more advanced templating with conditionals, loops, and filters:
Python
TypeScript
Jinja2 templates support advanced features like conditionals, loops, and filters, making them more powerful for complex prompt logic. However, Mustache templates are simpler and more portable.
Chat prompt versioning
Chat prompts are automatically versioned when the messages change. Each version has a unique commit ID.
Python
TypeScript
You can use get_chat_prompt to retrieve a specific version by commit ID, and get_chat_prompt_history to get all versions.
If you create a chat prompt with identical messages to an existing version, Opik will return the existing version instead of creating a duplicate. This helps avoid unnecessary version proliferation.
Prompt structure immutability
Once you create a prompt with a specific structure (text or chat), that structure cannot be changed. This ensures consistency and prevents accidental mixing of prompt types.
Similarly, if you create a text prompt first, you cannot later create a chat prompt with the same name.
Both Prompt and ChatPrompt classes will raise a PromptTemplateStructureMismatch exception if you attempt to change the structure of an existing prompt.
Working with prompt versions
Viewing prompt history (all versions)
Text prompts
Chat prompts
Use get_prompt_history for text prompts:
This returns a list of Prompt objects (each representing a specific version) for the given prompt name.
You can use this information to:
- Audit changes to understand how prompts evolved
- Identify the best performing version by linking commit IDs to experiment results
- Document prompt changes for compliance or review purposes
- Retrieve specific versions by commit ID for testing or rollback
Accessing specific prompt versions
Text prompts
Chat prompts
Use the commit parameter with get_prompt:
The commit parameter accepts the commit ID of the specific prompt version you want to retrieve. You can find commit IDs in the prompt history in the Opik UI or by using the get_prompt_history or get_chat_prompt_history methods (see above).
This is particularly useful when you want to:
- Pin to a specific version in production to ensure consistent behavior
- Test different versions side by side in experiments
- Roll back to a previous version if issues are discovered
- Compare results across different prompt versions
Prompt version tags
Opik supports tags at two levels, which serve different purposes:
- Prompt container tags — Applied to the prompt as a whole (shared across all versions). Set via the
tagsparameter when creating or updating a prompt. These are used for searching and organizing prompts and are covered in the Searching prompts section. - Prompt version tags — Applied to a specific individual version. Set via the
batch_update_prompt_version_tags/updatePromptVersionTagsAPI after creating the version. These allow you to label individual milestones (e.g., “production”, “stable”, “deprecated”) and filter version history.
This section covers prompt version tags (the per-version ones).
Managing tags from the UI
Prompt page and commit history
When you open a prompt from the library, the prompt page shows its full commit history — each version listed as a row with its commit ID, creation date, and any tags assigned to it:

Commits table
The commits table gives you a detailed view of all versions for a prompt. Each row shows the commit ID, template preview, change description, author, creation date, and the tags attached to that version. You can add or remove tags directly from this table by clicking on the tag editor for any row:

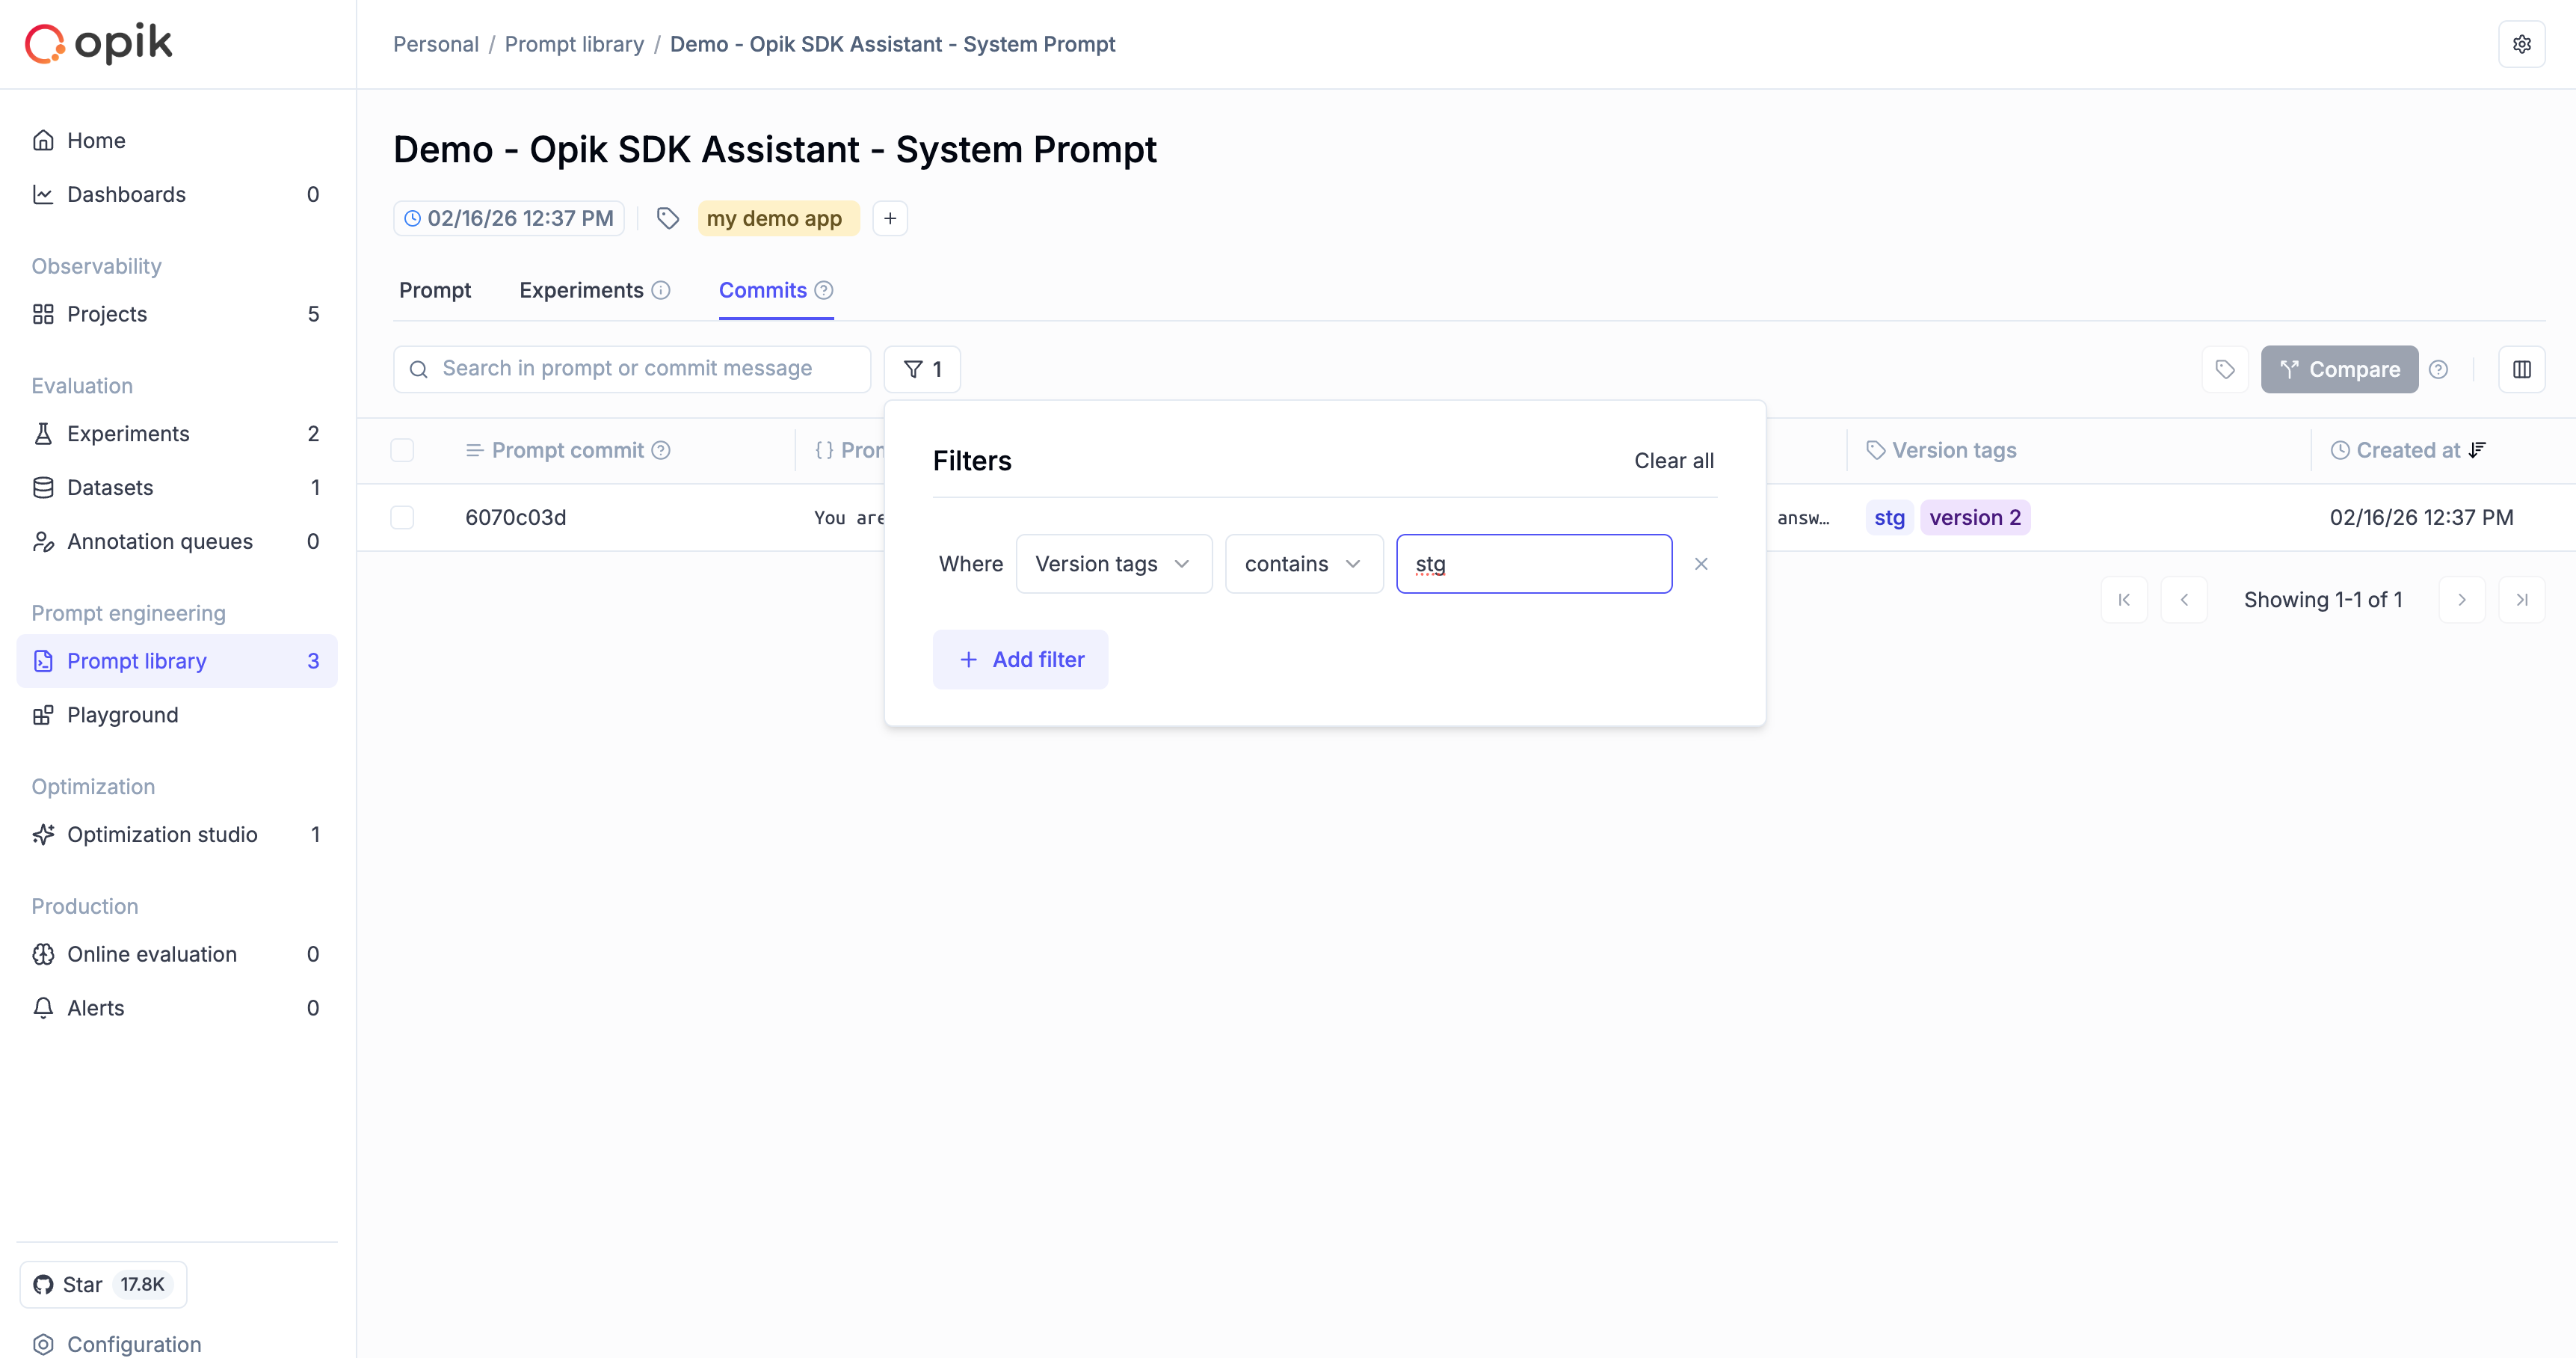
Filtering the commits table
The commits table supports filtering so you can quickly find versions by tag, template content, author, or other fields. Use the filter controls above the table to apply one or more filters:
Comparison view
When selecting a version to compare, the dropdown lists all versions with their tags displayed inline, making it easy to identify the right candidate without opening each version individually:
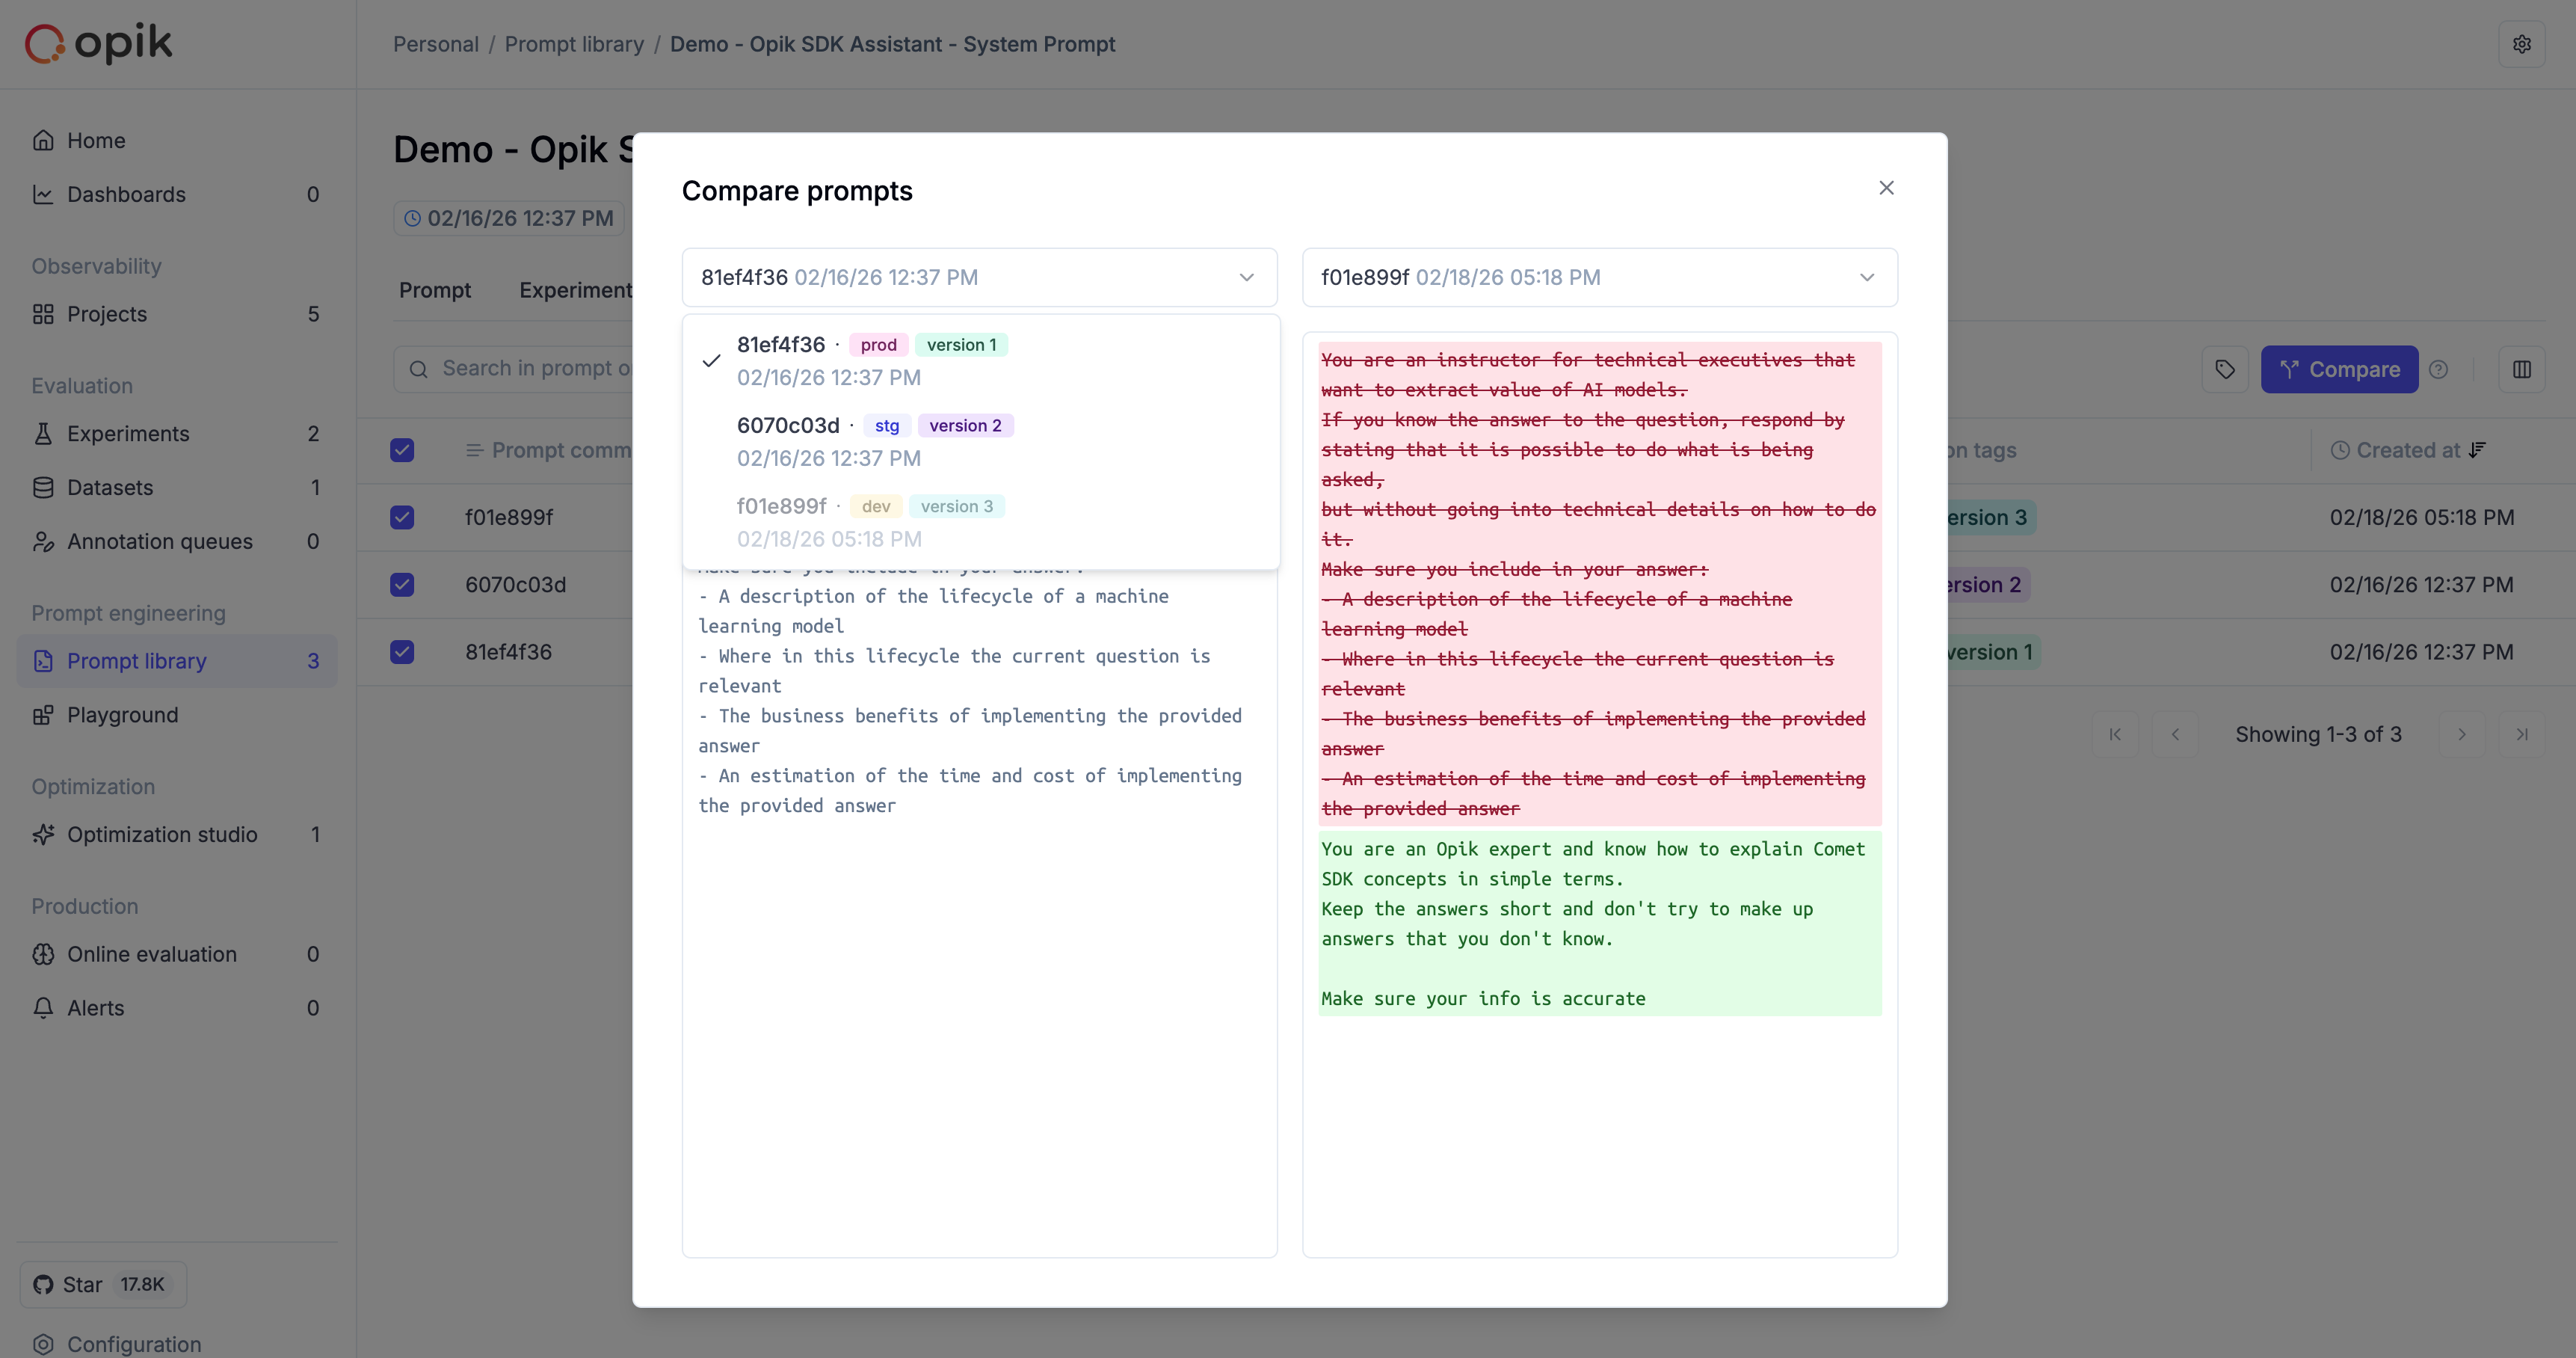
Once two versions are selected, their tags are shown alongside the commit ID and change description in the comparison dialog:

Batch updating tags
Use the batch update API to efficiently update tags on one or more prompt versions at once. This is especially useful when you want to promote a version to production or clean up tags after a release.
There are two update modes:
- Replace mode (default): replaces all existing tags with the new set
- Merge mode: adds the new tags to the existing ones (union)
Python
TypeScript
Access the PromptClient from the Opik client via get_prompts_client(), then call batch_update_prompt_version_tags:
Searching, filtering, and sorting version history
You can search, filter, and sort prompt version history to find specific versions.
Search
search performs a free-text match against template content and change description fields:
Python
TypeScript
Filter
Use filter_string (Python OQL) or filters (TypeScript JSON array) to narrow results by any version field.
Python
TypeScript
Supported fields for version filtering:
For Python, conditions are combined with AND in the OQL string. For TypeScript, add multiple objects to the filter array.
Sort (TypeScript only)
Sorting is currently only supported in the TypeScript SDK. Python’s get_prompt_history and get_chat_prompt_history always return versions newest-first.
Use the sorting option with a JSON-encoded sort array. Each entry specifies a field and direction ("ASC" or "DESC"):
Sortable fields include: id, commit, template, change_description, created_by, type, created_at.
Example: promoting a version to production
The following end-to-end example shows a common workflow: create a new prompt version, and then promote the best-performing version by tagging it as production.
Python
TypeScript
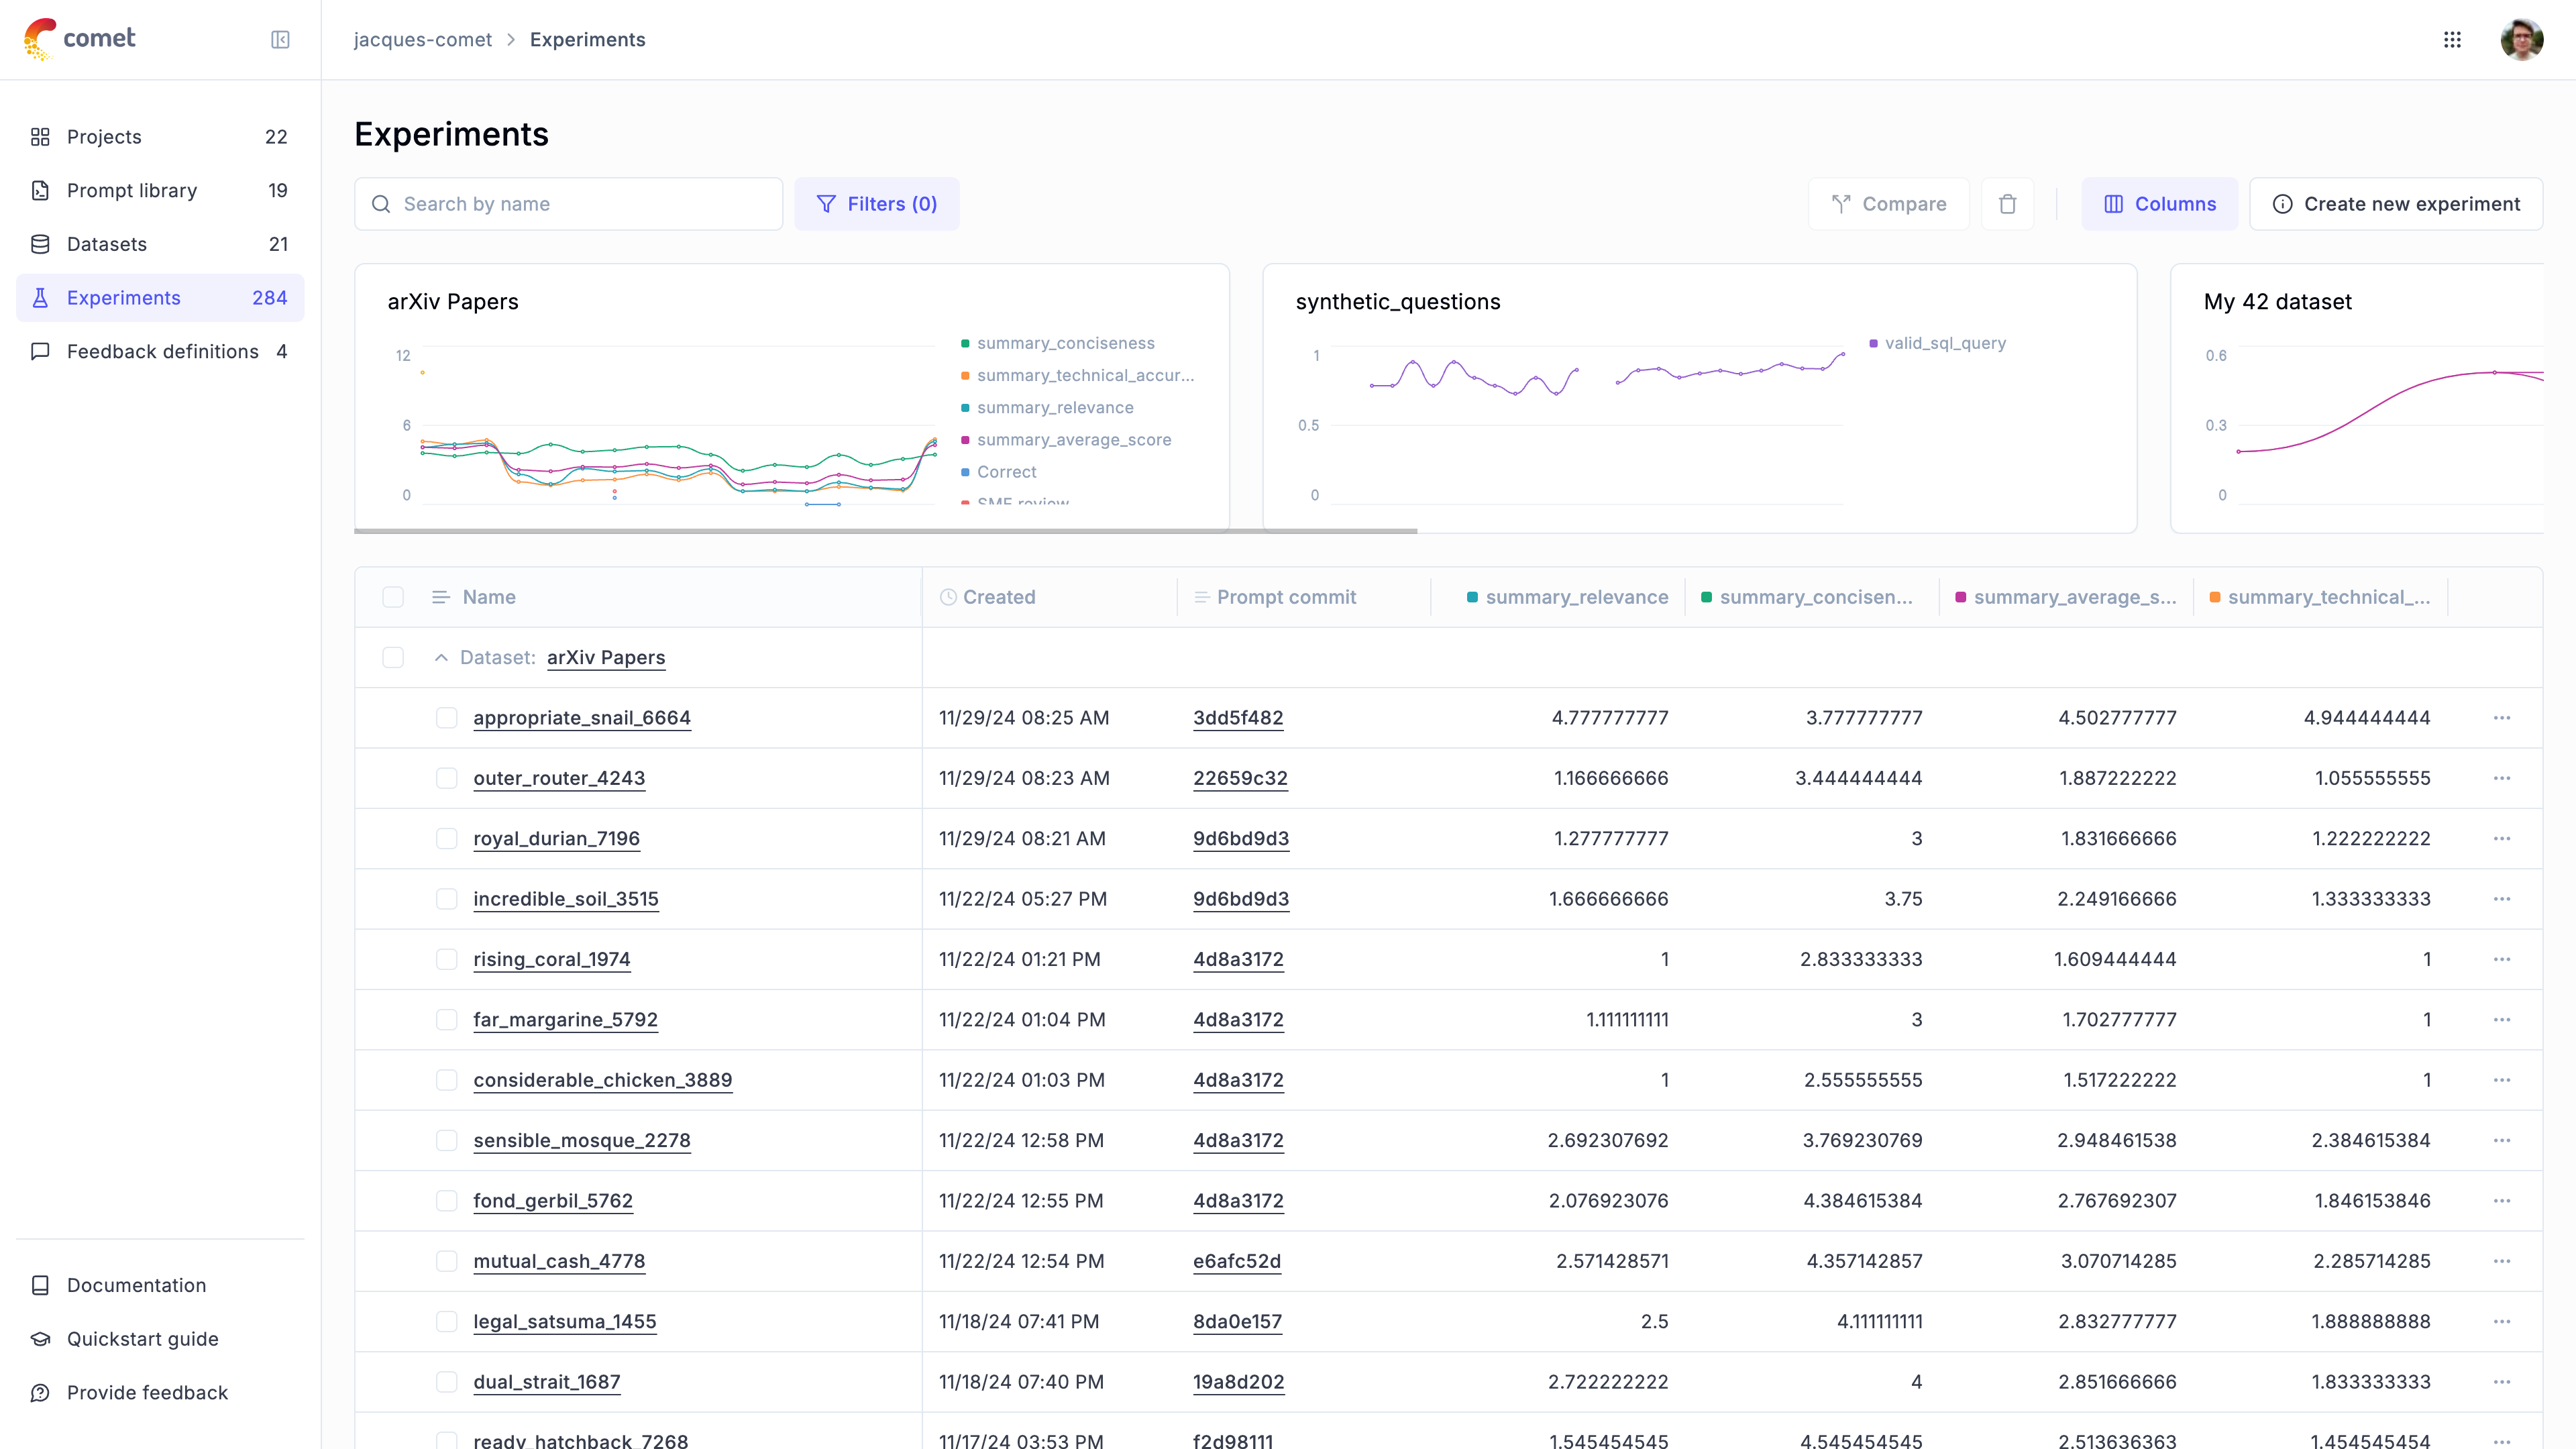
Using prompts in experiments
Linking prompts to experiments
Text prompt
Chat prompt
The experiment will now be linked to the prompt, allowing you to view all experiments that use a specific prompt:
Comparing prompt versions in experiments
Text prompts
Chat prompts
This workflow allows you to systematically test and compare different prompt versions to identify the most effective one for your use case.