In a previous article, I discussed the possibilities of computer vision-based deep learning with both RNNs and CNNs.
Generally, ML engineers will specialize in one model architecture and let the other slide.
My point and purpose for writing this post is the following: learning both allows to tackle a wider range of use-cases.
Last week, I tried the final project of the course Introduction to Deep Learningfrom HSE (Higher School of Economics). In this project, we learn how to use the output of a convolutional neural network (CNN) for tasks other than image classification or regression.
Here, we’ll instead learn how to feed this output into another neural network: a recurrent neural network (RNN). An RNN is a type of neural network that can work with sequences such as text, sound, videos, finance data, and more.
Combining CNNs and RNNs helps us work with images and sequences of words in this case. The goal, then, is to generate captions for a given image.
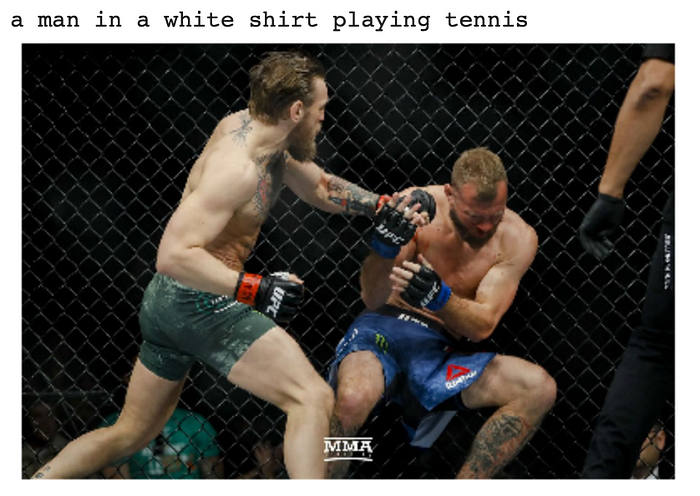
💬 For example, we could run the desired network on Conor McGregor’s UFC image and get a description. This will be our objective.

Before we start
- Subscribe to the daily emails and learn cutting-edge Computer Vision & Self-Driving Cars every day!
- Visit thinkautonomous.ai and get at the leading-edge of Autonomous Technologies
Why image captioning?

A picture is worth a thousand words. But sometimes we actually want the words.
Let’s pause a moment and try to understand the possibilities of image captioning.
If the output is a bunch of words, it means that we are going to use these words. Specifically, we’ll use these words for contextual understanding, or to describe more detailed scenarios.
Let’s say that you have to identify a specific type of clothing to then recommend other clothes in matching styles. This is called “visual search” and could change fashion retail forever.

In the image above, captioning can help us understand the specific clothes a person is wearing—and their overall style. In this example, the detail is not strong enough. A better image to input to the network would include more specific fashion items.
Going to the extreme use case, we could even translate a football match in real-time and replace the on-air commentary with AI-generated voices discussing the match. I’m not talking about robot voice here; we could imitate whoever we want.
Just look at this AI that can imitate Joe Rogan: https://fakejoerogan.com
How?
To do this, we need to use 2 different neural networks: a CNN and an RNN. Here I assume you’re a bit familiar with both. Before getting into technical details, let’s view the dataset and the output we want to generate.
Dataset

The dataset is a collection of images and captions. Here, it’s the COCO dataset. For each image, a set of sentences (captions) is used as a label to describe the scene.
It means our final output will be one of these sentences.
Pre-processing
The words are converted into tokens through a process of creating what are called word embeddings.

The process to convert an image into words/token is as follows:
- Take an image as an input and embed it
- Condition the RNN on that embedding
- Predict the next token given a START input token
- Use the predicted token as an input at the next time step
- Iterate until you predict an END token
TL;DR — We have images and sentences for each. Sentences are converted into vectors.
Encoder
The encoder is a convolutional neural network named Inception V3. This is a popular architecture for image classification.
The code used to compute that CNN with Keras is below:
def get_cnn_encoder():
    K.set_learning_phase(False)
    model = keras.applications.InceptionV3(include_top=False)
    preprocess_for_model = keras.applications.inception_v3.preprocess_input

    model = keras.models.Model(model.inputs, keras.layers.GlobalAveragePooling2D()(model.output))
    return model, preprocess_for_model
As you can see, the fully-connected layer is cropped with the parameter include_top=False inside the function call. This means that we directly use the convolutional features and we don’t activate them for a particular purpose (classification, regression, etc.).
Here; I assume you are already familiar with CNNs and this kind of code.
We simply create an Inception v3 model that we return; we don’t have to create the layers ourselves.
Decoder
The decoder part of the model is using a recurrent neural networks and LSTM cells to generate the captions.
Essentially, the CNN output is adapted and fed to an RNN that learns to generate the words.
How?
First, you might notice the vertical layers This is what a recurrent neural network produces. Every vertical layer is trying to predict the next word given the image.
The first layer will take the embedded image and predict “start”; then “man” is predicted, so the RNN will write “a man”; other tags are then generated, such as “pizza”.
We then learn how to say that a man holds a slice of pizza. The features are used and we try to correlate that with our captions.
In order to get a long-term memory, the RNN type is full of LSTM cells (Long Short-Term Memory) that can keep the state of a word. For example, a man holding ___ beer could be understood as a man holding his beer so the notion of masculinity is preserved here.
Finally, the horizontal layers are, like in deep learning, neural net layers. We could even stack more of these.
Let’s dive into the code to actually visualize it.
The decoder part first uses word embeddings. Let’s analyze the function.
We first define a Decoder class and two placeholders. In TensorFlow, a placeholder is used to feed data into a model when training. We’ll have one placeholder for image embedding and one for the sentences.
class decoder:
    img_embeds = tf.placeholder('float32', [None, IMG_EMBED_SIZE])
    sentences = tf.placeholder('int32', [None, None])
Then, we define our functions:
img_embed_to_bottleneckwill reduce the number of parameters.img_embed_bottleneck_to_h0will convert the previously retrieved image embedding into the initial LSTM cellword_embedwill create a word embedding layer: the length of the vocabulary (all existing words)
  img_embed_to_bottleneck = L.Dense(IMG_EMBED_BOTTLENECK, input_shape=(None, IMG_EMBED_SIZE), activation='elu')
  img_embed_bottleneck_to_h0 = L.Dense(LSTM_UNITS,input_shape=(None, IMG_EMBED_BOTTLENECK),activation='elu')
  word_embed = L.Embedding(len(vocab), WORD_EMBED_SIZE)
- The next part creates an LSTM cell of a few hundred units
- Finally, the network must predict words. We call these predictions logits, and we thus need to convert the LSTM output into logits
token_logits_bottleneckconverts the LSTM to a logits bottleneck. That reduces the model complexitytoken_logitsconverts the bottleneck features into logits using aDense()layer
  lstm = tf.nn.rnn_cell.LSTMCell(LSTM_UNITS)
  token_logits_bottleneck = L.Dense(LOGIT_BOTTLENECK, input_shape=(None, LSTM_UNITS), activation="elu")
  token_logits = L.Dense(len(vocab), input_shape=(None, LOGIT_BOTTLENECK))
- We can then condition our LSTM cell on the image embeddings placeholder.
- We embed all the tokens but the last
- Then, we create a dynamic RNN and calculate token logits for all the hidden states. We’ll use this with the ground truth
- We create a loss mask that will take the value 1 for real tokens and 0 otherwise
- Finally, we compute a cross-entropy loss, generally used for classification. This loss is used to compare the
flat_ground_truthto theflat_token_logits(prediction).
  c0 = h0 = img_embed_bottleneck_to_h0(img_embed_to_bottleneck(img_embeds))
  word_embeds = word_embed(sentences[:, :-1])
  hidden_states, _ = tf.nn.dynamic_rnn(lstm, word_embeds,initial_state=tf.nn.rnn_cell.LSTMStateTuple(c0, h0))

  flat_hidden_states = tf.reshape(hidden_states, [-1, LSTM_UNITS])
  flat_token_logits = token_logits(token_logits_bottleneck(flat_hidden_states))
  flat_ground_truth = tf.reshape(sentences[:, 1:], [-1])

  flat_loss_mask = tf.not_equal(flat_ground_truth, pad_idx)
  xent = tf.nn.sparse_softmax_cross_entropy_with_logits(labels=flat_ground_truth, logits=flat_token_logits)
  loss = tf.reduce_mean(tf.boolean_mask(xent, flat_loss_mask))
Results
Let’s visualize some results on real data.


A couple representative takeways:
- It’s not all perfect, but there is a solid context understanding.
- On the top right image, the woman is confused with a man.
To dive deeper, we might want to train the full network on more on object that represent more specific use cases (fashion, sports, etc).
Now, what about the UFC image?

I’m a bit disappointed—the model doesn’t understand what UFC is, who Conor is, and what a left hook looks like! We definitely can’t use that model with any image. We’d need to train the model on UFC examples to get better sentences. However, I’m convinced that we can achieve it.
To learn more about the full project check out this GitHub repo.
