
Python’s Pandas library has long been the trusted companion of data analysts and data scientists. This library is known for its data manipulation, transformation, and wrangling capabilities. But what if I told you there’s a way to bring the power of Generative Artificial Intelligence to the Pandas library?
While researching LLMs (large language models), I came across PandasAI, a library that adds Generative AI capabilities to Pandas. This library will revolutionize how we can work with data by allowing us to turn complex queries into simple conversations. This article will dive into PandasAI, explore its capabilities, and how you can keep track of your model with Comet. We will also explore CometLLM.
Overview of PandasAI
PandasAI is a powerful Python library that uses generative AI models to make Pandas conversational. This lets you use natural language to execute Pandas’ commands, like manipulating data frames and plotting a graph.
It is essential to know that while PandasAI is a game changer, it is designed to be used with Pandas and not replace it.
Tools to be Used
- Jupyter Notebook or Google Colab for experimentation
Installation
To get started, we will need to install the PandasAI. Run the command below:
pip install pandasai
You might run into this error: “ERROR: Could not find a version that satisfies the requirement pandasai (from versions: none) ERROR: No matching distribution found for pandasai“.
This is because PandasAI requires Python >=3.9, <4.0. To solve this, you need to upgrade your Python.

Getting Started with PandasAI
LLMs power PandasAI and support several large language models (LLMs), from OpenAI, Azure OpenAI, and Google PaLM to HuggingFace’s Starcoder and Falcon models. These models are essential to give PandasAI its natural language query capabilities.
We must use OpenAI LLM API Wrapper for this tutorial to power PandasAI’s generative artificial intelligence capabilities. We will need to set up an OpenAI account and generate an OpenAI API token key, which you can find on your account here. You should set up billing since OpenAI access is a paid service; I will show you how to monitor your billing later in the article.
from pandasai import PandasAI
from pandasai.llm import OpenAI
llm = OpenAI(api_token="*******")
Note: ******* represents your OpenAI API token key. You can find on your account here.
Our Dataset
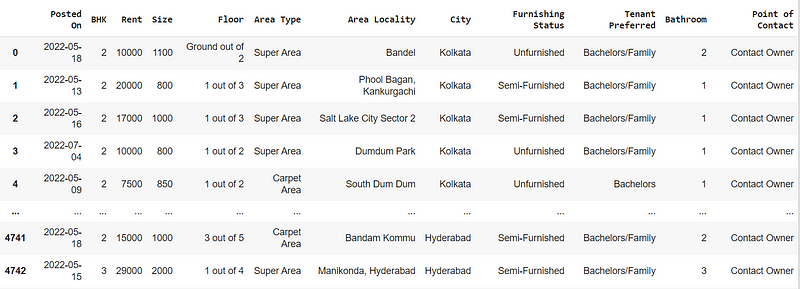
I will use the house rent prediction dataset I found on Kaggle for this article. The dataset contains information like the number of bedrooms, kitchens, the rent, city, area, and furnishing status of over 4,000 houses, apartments, and flats in India.
We will now load our dataset using the Pandas library.
import pandas as pd
# House rent dataset link: https://www.kaggle.com/datasets/iamsouravbanerjee/house-rent-prediction-dataset
df = pd. read_csv('/content/House_Rent_Dataset.csv')
df.head(5)
Exploring Our Dataset with PandasAI and OpenAI
We can now explore the dataset with PandasAI’s generative artificial intelligence capabilities. Just as Pandas has dataframes, PandasAI has SmartDataframes.
SmartDataframe has the same properties as pd.DataFrame but with conversational features.
from pandasai import SmartDataframe
sdf = SmartDataframe(df, config={"llm": llm})
Now, let’s explore PandasAI.
sdf.impute_missing_values()
This command will impute missing values in your data frame.
To ask your data questions using PandasAI, you use sdf.chat
sdf.chat(“who is the ideal tenant for a 3 bedroom in kolkata”)

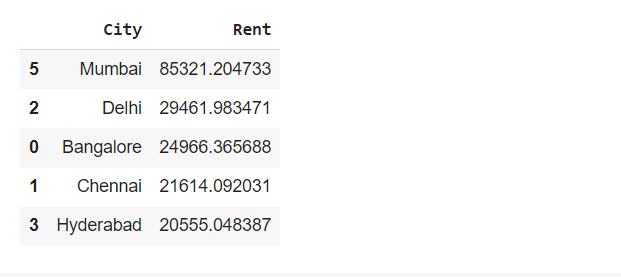
sdf.chat(“Return the top 5 expensive city by rent”)
sdf.chat(“In a table show me the average rent in the various cities each month and group this data by the BHK”)
#BHK here represent numbers of bedrooms, hall, and kitchen

sdf.chat(“In a table show me the number of Point of Contact in the various cities each month and group this data by the Point of Contact”)

You can also generate charts with PandasAI:
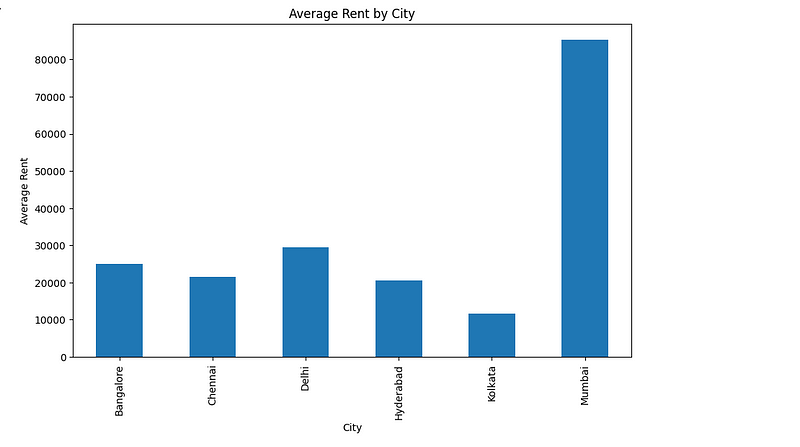
sdf.chat(“Plot a chart of the average rent by city”)
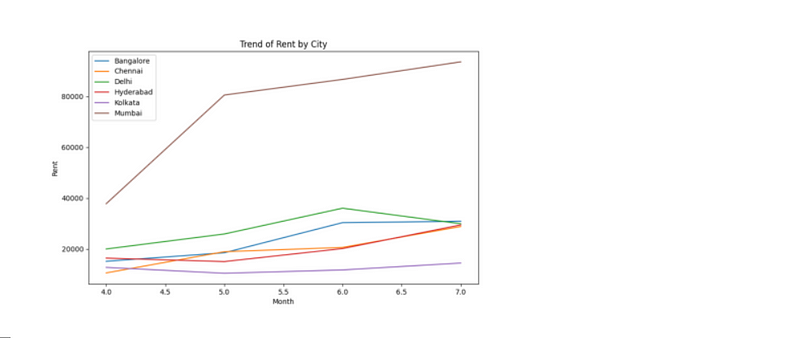
sdf.chat(“Create a line chart to show the trend of rent by city in the last few months”)
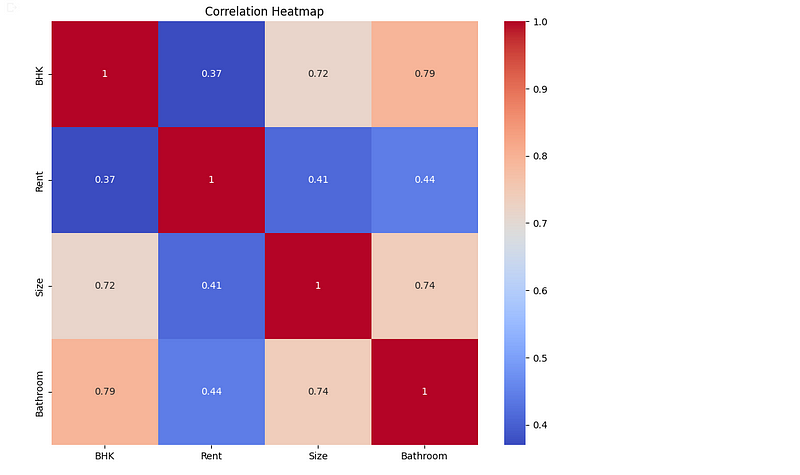
sdf.plot_correlation_heatmap()
sdf.chat(“Calculate the average cost of rent in Delhi”)

Here is a GitHub gist of the code snippets.
# This command will impute missing values in your data frame.
sdf.impute_missing_values()

# To ask your data questions using PandaAI, you use sdf.chat

sdf.chat("who is the ideal tenant for a 3 bedroom in kolkata")

sdf.chat("Return the top 5 expensive city by rent")

sdf.chat("In a table show me the average rent in the various cities each month and group this data by the BHK") #BHK here represent number of bedrooms, hall, and kitchen

sdf.chat("In a table show me the number of Point of Contact in the various cities each month and group this data by the Point of Contact")

# You can also generate charts with PandaAI;

sdf.chat("Plot a chart of the average rent by city")

sdf.plot_correlation_heatmap()

sdf.chat("Create a line chart to show the trend of rent  by city in the last few months")

sdf.chat("Calculate the average cost of rent in Delhi")
Worried about the Billing? Count Your Tokens
OpenAI’s API process and break down your prompts into tokens. You can think of them as pieces of words and characters. You should visit the official documentation to learn more.
You can analyze and count the number of tokens your prompt uses using the command below.
from pandasai.helpers.openai_info import get_openai_callback
with get_openai_callback() as cb:
response = sdf.chat("Calculate the average cost of rent in Delhi")
print(response)
print(cb)

You can also check out your usage on OpenAI here.
Logging your Artifacts on Comet
Once done, you should log the dataset (Comet calls these Artifacts) to Comet. This way, when working and building machine learning models, you can automate and keep track of your code and artifacts.
To get started, we will need to create a Comet account. This will enable us to log our Artifacts on the Comet platform through an “experiment.” Let’s log a new experiment with our house rent prediction dataset using the code below:
import comet_ml
from comet_ml import Artifact, Experiment
#Initialize comet instance for API Key
comet_ml.login()
Here, we imported and initialized the CometML library. Once you run this, you will be prompted to pass your Comet API key into Colab or Jupyter.
Next, we create an Experiment object by giving it a name and the workspace it should belong to. You can get all your available workspaces here. After that, we will create an Artifact instance by giving it a name, Artifact type and specifying the file path with the artifact.add(). Then, we end the experiment.
You can do that using the code below:
# Install and import the Comet Library:
import comet_ml
from comet_ml import Artifact, Experiment

# Initialize comet instance for API Key. You can access your API Key here: https://www.comet.com/account-settings/apiKeys
comet_ml.login()

# Create an Experiment object by giving it a name and the workspace it should belong to.
# You can get all your available workspaces here: https://www.comet.com/account-settings/workspaces

experiment = Experiment(project_name="Rent Experiment", workspace="bennykillua")

# Initialize Artifact by giving it a name, artifact_type, and specifying the file path with the artifact.add().

artifact = Artifact(name="HouseRent", artifact_type="dataset")

#Specify the path of the artifact

artifact.add(r"/content/House_Rent_Dataset.csv")
We can now log the artifact to the Comet platform.

#log artifact to experiment
experiment.log_artifact(artifact)

#end the experiment
experiment.end()
Logging with CometLLM
However, since this is an LLM project, it will be best to log our prompt using CometLLM.
CometLLM is a new suite of LLMOps tools designed to help you effortlessly track and visualize your LLM prompts and chains.
First, we will need to install the Comet Library:
pip install comet_llm
Then, we will also need our API key, which we can get from our Comet account. Once you have that, we can log our prompts and their outputs to Comet.
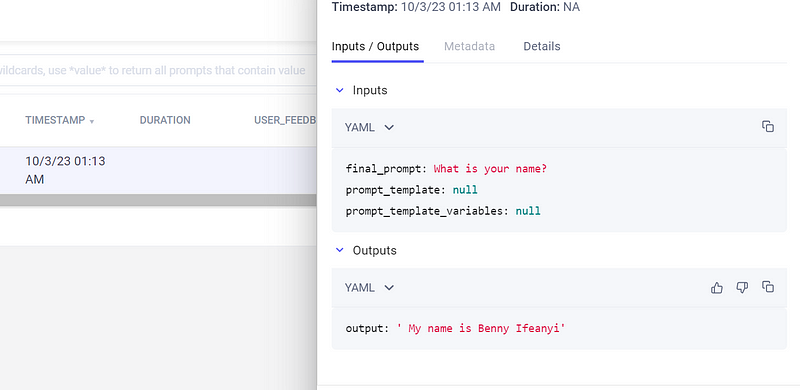
We can test CometLLM by running the code below:
import comet_llm

comet_llm.log_prompt(
    prompt="What is your name?",
    output=" My name is Benny Ifeanyi",
    api_key="YOUR_COMET_API_KEY",
    project = "MY_Project_",
)
This is the output. You can view it on the Comet platform as well.
Now, let’s log our prompt and their output. We can do that using the code below:
import comet_llm
import os


# Define your questions
questions = [
    "Return the top 5 expensive city by rent"
]

# Create a list to store question-response pairs
question_response_pairs = []

# Log the questions and responses to CometLLM and store them
for question in questions:
    # Generate the response using sdf.chat (this is the PandaAI model we created earlier)
    response = sdf.chat(question)  # Response is a string

    # Store the question and response in the list
    question_response_pairs.append({"question": question, "response": response})

# Save the question-response pairs to a CSV file
csv_file_path = '/content/question_response_pairs.csv'
pairs_df = pd.DataFrame(question_response_pairs)
pairs_df.to_csv(csv_file_path, index=False)

with open(csv_file_path, 'r') as csv_file:
    csv_content = csv_file.read()

# Log the entire CSV content as the response to CometLLM
comet_llm.log_prompt(
    prompt="Question-Response Pairs",
    output=csv_content,
    api_key="YOUR_COMET_API_KEY",
    project="MY_Project_",
)
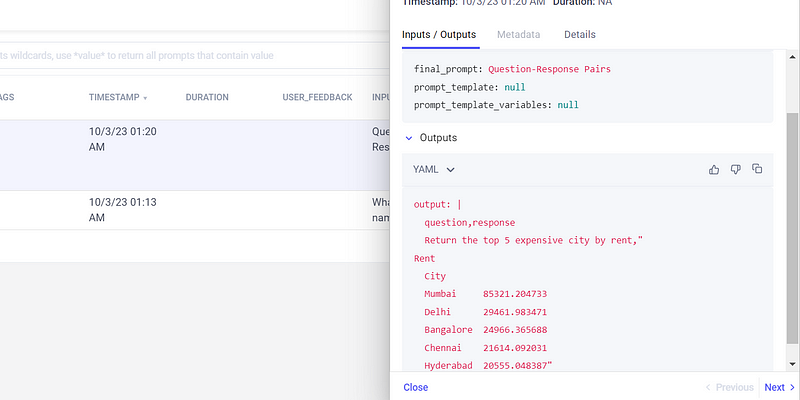
This is the output. You can also view it on the Comet Platform.
However, we can’t log our dataset with CometLLM right now because, at the moment, this isn’t supported.
What’s next?
From here, we can do much more, like using the Comet UI to score our prompt outputs or to search from specific prompts. This is helpful when working with thousands of prompts.
All of these and much more were covered in this article: Organize Your Prompt Engineering with CometLLM.
Conclusion
PandasAI has brought generative artificial intelligence capabilities to the Pandas library. You can explore these capabilities on your datasets and start exciting projects with other LLM models like Azure OpenAI and LangChain (which you can view in the GitHub gist below). Lastly, remember to track, compare, and optimize your ML experiments as you work with Comet.
P.S. If you prefer to learn by code, check out this Github gist, which hosts an informative Google Colab notebook with all the code snippets.