Streamlit App for Data Science Projects
Streamlit is an open-source Python library that makes it easy to build and share custom web applications for machine learning and data scienceprojects.
You can visualize your data with different Streamlit elements and also you can use Html, CSS, and JavaScript codes in your Streamlit app. This means that you can develop professional web applications.
Okay, we can dive into the details for the app web application! I often use Streamlit. Today, I will introduce you to the features I often encounter and share my own tips and some detailed information.
With this Medium Blog, we will develop a Streamlit page together, step by step. I will explain all the steps in detail. We will create a home page consisting of two tabs and sidebars, Lightside and Darkside. On this page, we will list our data in different formats, show it with graphs, and see how different pieces of code are added to our Streamlit code.

Meet with Streamlit
Streamlit presents so many features such as buttons, sidebar, page design, checkbox, and more. You can also visit Streamlit’s tutorial on the website.
Today’s goal is to meet with Streamlit and develop the first data web page!
I created a small dataset by collecting my own Twitter statistics. I will create a web page with Streamlit and display this dataset on this page. We will look at visualizing, presenting, and displaying the dataset on our web page by interfering with the dataframe. You can reach this data and code on my GitHub repo.
This image is an excel data part and I will use only some columns.

First, I should import my data to code with a CSV file for more than readability.
import pandas as pd

data = pd.read_csv("twitter.csv", sep=";")
I added a CSV file and next is going to Streamlit!
import pandas as pd
import streamlit as st

data = pd.read_csv("twitter.csv", sep=",")
st.write(data)
Only I added streamlit and used the “write” function, and I have a web page on my local! I am seeing my data with this write function. You can use Streamlit website for installing and creating env.

Layout and Containers
- Organizing page? Sounds great!
We can organize our own web page and Streamlit is presenting some features about it. We can split cells, and web pages inside and we can group images, texts, and elements.
It is possible to create more organized page structures with the elements we will use in layouts and containers. With the sidebar we will use in our example below, we can decide how to visualize our data with quick actions on the left while we can visualize our data on the right. This means pages where we can take real-time actions and see our data clearly!
Sidebar
We can create an area for our page elements like text, buttons, etc.
import pandas as pd
import streamlit as st

data = pd.read_csv("twitter.csv", sep=",")
st.write(data)

with st.sidebar:
  st.write("Here is sidebar")
I used a sidebar func with Streamlit and I wrote a text. You can see the result below.

Tabs
- Page in page? Why not!
You can see the tabs’ default function below.
st.tabs(tabs)
I will create special tabs with my design. I will create these tabs with markdown but I will show the design tabs in detail in the next steps.
I am creating 2 tabs and the names are “Light Side” and “Dark Side.” And I am showing my data frame result in Light Side tabs.
def tabs(default_tabs = [], default_active_tab=0):
    if not default_tabs:
        return None

    active_tab = st.radio("", default_tabs, index=default_active_tab, key='tabs')
    child = default_tabs.index(active_tab)+1

active_tab = tabs(["Light Side", "Dark Side"])

if (active_tab == "Light Side"):
    st.write(data)

Column
Another step of being organized is the use of columns. We can add images, text, and different content by dividing our page into columns.
st.columns(spec, *, gap="small")
In this step, I made an example with two columns and full of text. I performed the column separation process in the second tab (Dark Side).
if (active_tab == "Light Side"):
    st.write(data)

else:
    layout = st.columns([1, 2])
    with layout[0]:
        st.write("Column A")

    with layout[-1]:
        st.write("Column B")

Elements
With Streamlit you can add different elements to your application. Button, slidebar, checkbox, and more.
The most important thing to keep in mind when building and deploying your model? Understanding your end-goal. Read our interview with ML experts from Stanford, Google, and HuggingFace to learn more.
Buttons:
I think one of the features I use the most is the Button. You can visualize your data, get in-page printouts and show different data by adding different prerequisites.
st.button(label, key=None, help=None, on_click=None, args=None, kwargs=None, *, disabled=False)
if st.sidebar.button('Get Results'):
    if (active_tab == "Light Side"):
        st.write(data)
    else:
        layout = st.columns([1, 2])
        with layout[0]:
            st.write("Column A")
        with layout[-1]:
            st.write("Column B")
Checkbox:
Yes or no? It’s the checkbox’s job to look for the answer to this question.
st.checkbox(label, value=False, key=None, help=None, on_change=None, args=None, kwargs=None, *, disabled=False)
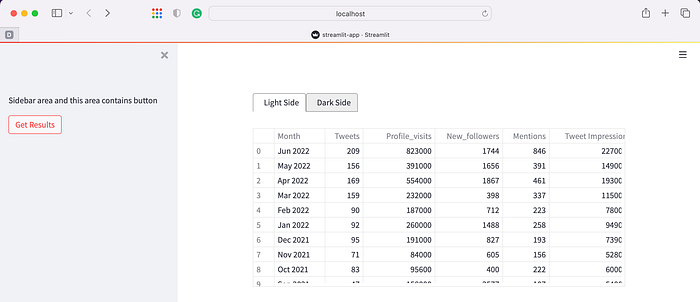
I created a code sample for checkbox and button usage. If users like this app and wanna get results, we can show our data! I included text, a checkbox, and a button in the sidebar area.
with st.sidebar:
    st.write("Do you like this app?")
    cbox = st.checkbox('yes')

if st.sidebar.button('Get Results'):
    if cbox:
        if (active_tab == "Light Side"):
            st.write(data)
        else:
            layout = st.columns([1, 2])
            with layout[0]:
                st.write("Column A")

            with layout[-1]:
                st.write("Column B")

DataFrame, Table and Different Versions with Streamlit
Streamlit supports different content such as tables, data frames, and text. You can print it in Streamlit according to the entity you will give.
In this title, I will give an example of a Dataframe:
st.dataframe(data=None, width=None, height=None, *, use_container_width=False)
We have seen that with the write function we can print a data frame as if it were printing text. We can get data frame output on the screen with both the write function and the data frame function. You can use these functions ready-made in Streamlit, and you can easily get printouts for Data Science projects.
if st.sidebar.button('Get Results'):
    if cbox:
        if (active_tab == "Light Side"):
            st.write(data)
            st.dataframe(data["Tweet Impressions"])
You can see our data output for the write function and data frame function below. We can take our data and the fields we want our data to be displayed specifically from the data frame and produce special output.

Chart/Visualize with Streamlit
With the help of Charts, we can visualize our data, analyze our data, and get summary information. When we say “Python” and “Data,” we can think of charts, which are part of data analysis and data visualization. With Streamlit, we can also use charts and quickly include them in our code. Let’s examine the examples!

When I say data visualization, I think of features such as Plotly, Pyplot, and mapping. The great news is that Streamlit supports them. Let’s exemplify Pyplot from these features!
Here I drew a line chart for the Tweets column in our data.
st.line_chart(data['Tweets'])
The output is very clean, very visual and very modern!
Code in Streamlit
We added the Markdown code to our Streamlit code that we give examples of. Streamlit supports different types including Markdown.
The support I want to talk about is the support it provides for HTML, CSS, and Javascript codes. While developing data science projects and working with Python, we may need to add HTML, CSS, and Javascript codes to our code in order not to compromise some visual and functional features. This can be for the visual elements we need to add, or it can be for customizing a component in Streamlit. Streamlit supports us to add different pieces of code
Theme
This is my favorite part! Streamlit supports different theme features and I love that.
You can change the background, text color, and font. Streamlit uses some default elements and you can design this.
For web site theme, the default is your computer’s default. This means that if you are using the dark theme, your page will be dark. That’s awesome! Also, directly you can select a theme, and then you can design your website page.
Also, you can color texts, change fonts, and you can create your contents like a rainbow.
Deploy App
The part where I’m going to publish an app is the hardest part. Choosing where to publish, looking at cloud environments, and determining publishing details according to needs. One of the things that makes Streamlit special is that it hosts the Streamlit Cloud feature and offers options for those who will deploy their application.

You can publish your Data Science projects with Streamlit Cloud and benefit from Docker and Kubernetes tools.
I’ve added the code that contains the whole sample code snippet to my GitHub repository. You can get the results I gave in the example by downloading the code and installing Streamlit on your computer.
With this blog, I presented a Streamlit Data Science project. You can follow my Medium account, if you like the article, you can present your appreciation with claps.
You can also follow and communicate with me on social media. Thanks!
Related Articles