MLOps Pipeline with GitLab in Minutes

In this article, you’ll learn deploy your Flask application to Heroku with GitLab in minutes! You’ll implement the MLOps pipeline, with continuous integration (CI), and continuous deployment (CD), with easy-to-follow, step-by-step explanations. You’ll automate the MLOps CI-CD pipeline with GitLab seamlessly.
Contents
Introduction
GitLab
Continuous Integration (CI) Part
GitLab Preparation
Continuous Integration (CI) with GitLab
.gitlab-ci.yml File
Continuous Deployment (CD) Part
CD part of .gitlab-ci.yml File
Conclusion
Introduction
In this article, we will discuss implementing an end-to-end MLOps pipeline using GitLab and Heroku. Before moving further, let’s learn a little bit about GitLab.

GitLab
GitLab’s web page starts with the slogan “The One DevOps Platform.” It continues with the explanation, “From planning to production, bring teams together in one application. Ship secure code faster, deploy to any cloud and drive business results. Automatically verify your code with powerful continuous integration (CI) capabilities.” (https://about.gitlab.com/)
This is a great introduction to what you can use GitLab for. Without further ado, let’s see GitLab’s CI-CD capabilities in action!
Continuous Integration (CI)
For the CI part, I used the heart-failure dataset from Kaggle. You can find my detailed discussion on EDA and ML models on here. Based on the final Catboost model, a basic Flask App has been developed. But before pushing to GitHub, let’s be sure that everything is okay in the local environment.

As we can see above, everything is working well.
GitLab Preparation
After getting a free account on the GitLab web page, we can start to write our new project on GitLab. First, select a new project, give a name to the project, and then we can start the project.

Now we can push our directory to GitLab by using the following provided Git Commands from the GitLab page.
git init --initial-branch=main

git remote add origin git@gitlab.com:kb1907/gitlab-ci-cd.git

git add .

git commit -m "Initial commit"

git push -u origin main
Before using the GitLab CI pipeline, however, we need to install GitLab Runner. “GitLab Runner is an application that works with GitLab CI/CD to run jobs in a pipeline.” You can find the installation information here. For this tutorial, I’ll use Homebrew to install the GitLab Runner.
brew install gitlab-runner
Then we will install GitLab Runner as a service and start it.
brew services start gitlab-runner
GitLab Runner is now installed and running. We will then register GitLab Runner.
sudo gitlab-runner register
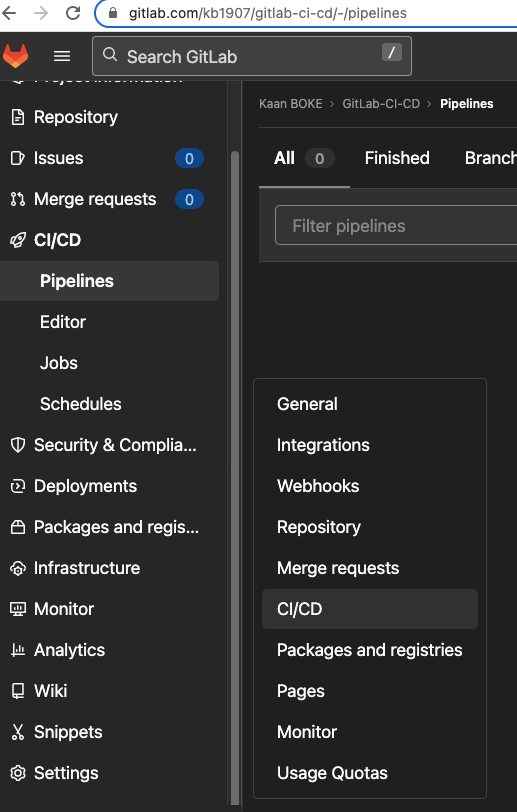
After entering your system password, you’ll get several questions. To answer these questions, go to your project’s GitLab website. Go to settings and select CI-CD, as shown below:

Then select Runner and copy the URL address as shown below:

Paste the URL address as an answer to: gitlab-ci coordinator URL and provide a token from the same page as an answer to: token for this runner
Next, describe your runner. I gave gitlab-heroku as a description in the example. Then it will ask for the tag name, which is very important, because we will use it on CI.yml file. This tag will map our project to the runner. I used the same name for this tag, gitlab-heroku. Finally, it will ask for the executor. I selected “shell”.
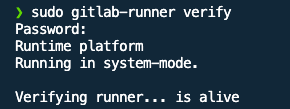
That’s it. The runner is registered successfully! Let’s verify it.

Now we can start this runner:

The runner is actively listening to any commit in our GitLab repository.
Continuous Integration (CI) With GitLab
Now, we can start to implement the continuous integration (CI) part of the pipeline. The first thing we need to do is write a .yml file. Let’s do that.
.gitlab-ci.yml file
To start the continuous integration part of the pipeline, we need to inform GitLab of each step of the pipeline with the specific commands. Remember that the .yml file must be named as .gitlab-ci.yml
image: python:3.9-slim

stages:
  - build
  - test
  - deploy

build:
  stage: build
  tags:
    - "gitlab-heroku"
  script:
      - pip install -r requirements.txt

run_tests:
  stage: test
  tags:
    - "gitlab-heroku"
  script:
    - python -m pytest -vv test.py
Let’s look at the .yml file in detail:
image: python:3.9-slim
The .yml file will use Python version 3.9 version.
stages:
  - build
  - test
  - deploy
The .yml file defines three stages. In the CI part, we will use the first two (build & test):
build:
  stage: build
  tags:
    - "gitlab-heroku"
  script:
      - pip install -r requirements.txt
In the build stage, we first defined the stage name as build. Then we used tags as our runner’s tag, which is gitlab-heroku. Without this, the CI pipeline will fail. And finally, we gave a command to install the required libraries.
run_tests:
  stage: test
  tags:
    - "gitlab-heroku"
  script:
    - python -m pytest -vv test.py
Most projects fail before they get to production. Check out our free ebook to learn how to implement an MLOps lifecycle to better monitor, train, and deploy your machine learning models to increase output and iteration.
At the test stage, we again used tags as our runner’s tag, which is gitlab-heroku.
Although it seems like a repetition, in each step we are running one stage of the pipeline, and each stage needs a runner. For that, we have to define the runner for each stage.
Before pushing the .yml file and starting the continuous integration part of the pipeline, let’s verify our runner from the GitLab website:

As you can see, everything seems fine and working. So, let’s start the continuous integration part of the pipeline and check the results.

The pipeline started with the build stage:

Now the pipeline continues with the second stage:

Both of the stages completed successfully! We can now move on to the continuous deployment (CD) part of the MLOps pipeline.
Continuous Deployment (CD) With Heroku
For this part, we will use Heroku as a cloud application platform. Using our Flask application in the Heroku environment, we need to create Procfile and put this one line command in it.
web gunicorn app:app
Let’s go to the Heroku website and create a new application:

We need to get an authentication token from Heroku to connect directly from GitLab and start continuous deployment. From Account settings / Applications, we selected create authorization option.

We need this token when creating variables in GitLab.
Variables store information like passwords or tokens.

We will add two variables:
HEROKU_STAGING_APP: Heroku app’s nameHEROKU_STAGING_API_KEY: Token which we got previously.

CD part of .gitlab-ci.yml file
We can finalize our .yml file by adding the last stage:
deploy:
  stage: deploy
  image: ruby:latest
  tags:
    - "gitlab-heroku"
  script:
    - gem install dpl
    - dpl --provider=heroku --app=$HEROKU_STAGING_APP --api-key=$HEROKU_STAGING_API_KEY
  only:
    - main
Let’s look at this part in detail:
deploy:
  stage: deploy
  image: ruby:latest
  tags:
    - "gitlab-heroku"
At the deployment stage, we will use Ruby to deploy our app to Heroku. For that, we will get the Ruby image.
We used tags as our runner’s tag, which is gitlab-heroku.
script:
    - gem install dpl
    - dpl --provider=heroku --app=$HEROKU_STAGING_APP --api-key=$HEROKU_STAGING_API_KEY
Ruby will install the dpl library. dpl will deploy our app from GitLab to Heroku by using previously defined variables.
only:
    - main
Whenever there is a change on the main branch, it will deploy. We are now ready to start the CD part of the pipeline.

As we can see, everything on the GitLab side is fine. Let’s take a look at the Heroku website and see our app:

We did it!

Conclusion
In this article, we established the MLOps CI-CD pipeline by using the GitLab platform with Heroku. We automated the MLOps CI-CD pipeline with GitLab in minutes. The GitLab Runner preparation took some time, but other than that, everything worked seamlessly. I hope that it helps.
By the way, if you like the topic, you can show it by supporting with a 👏!
Feel free to leave a comment and thanks for your time.
All the best 🤘
The code can be downloaded here.
If you enjoy reading my content, please consider following me. Also, you can support me and other writers by subscribing to Medium. Using my referral link will not cost you extra.


