Welcome to Lesson 7 of 12 in our free course series, LLM Twin: Building Your Production-Ready AI Replica. You’ll learn how to use LLMs, vector DVs, and LLMOps best practices to design, train, and deploy a production ready “LLM twin” of yourself. This AI character will write like you, incorporating your style, personality, and voice into an LLM. For a full overview of course objectives and prerequisites, start with Lesson 1.
Lessons
- An End-to-End Framework for Production-Ready LLM Systems by Building Your LLM Twin
- Your Content is Gold: I Turned 3 Years of Blog Posts into an LLM Training
- I Replaced 1000 Lines of Polling Code with 50 Lines of CDC Magic
- SOTA Python Streaming Pipelines for Fine-tuning LLMs and RAG — in Real-Time!
- The 4 Advanced RAG Algorithms You Must Know to Implement
- Turning Raw Data Into Fine-Tuning Datasets
- 8B Parameters, 1 GPU, No Problems: The Ultimate LLM Fine-tuning Pipeline
- The Engineer’s Framework for LLM & RAG Evaluation
- Beyond Proof of Concept: Building RAG Systems That Scale
- The Ultimate Prompt Monitoring Pipeline
- [Bonus] Build a scalable RAG ingestion pipeline using 74.3% less code
- [Bonus] Build Multi-Index Advanced RAG Apps
This lesson will show you how to fine-tune open-source LLMs from Hugging Face using Unsloth, TRL, AWS SageMaker and Comet ML to ensure the following:
- MLOPs best practices using Hugging Face and Comet ML;
- Use VRAM optimally during fine-tuning using Unsloth and TRL;
- Operationalize your training pipelines using AWS SageMaker.
We will primarily focus on engineering scalable and reproducible fine-tuning pipelines (using LLMOps and SWE best practices) rather than digging into fine-tuning techniques.
We will stick to what usually works for fine-tuning, such as using LoRA for supervised fine-tuning (SFT).
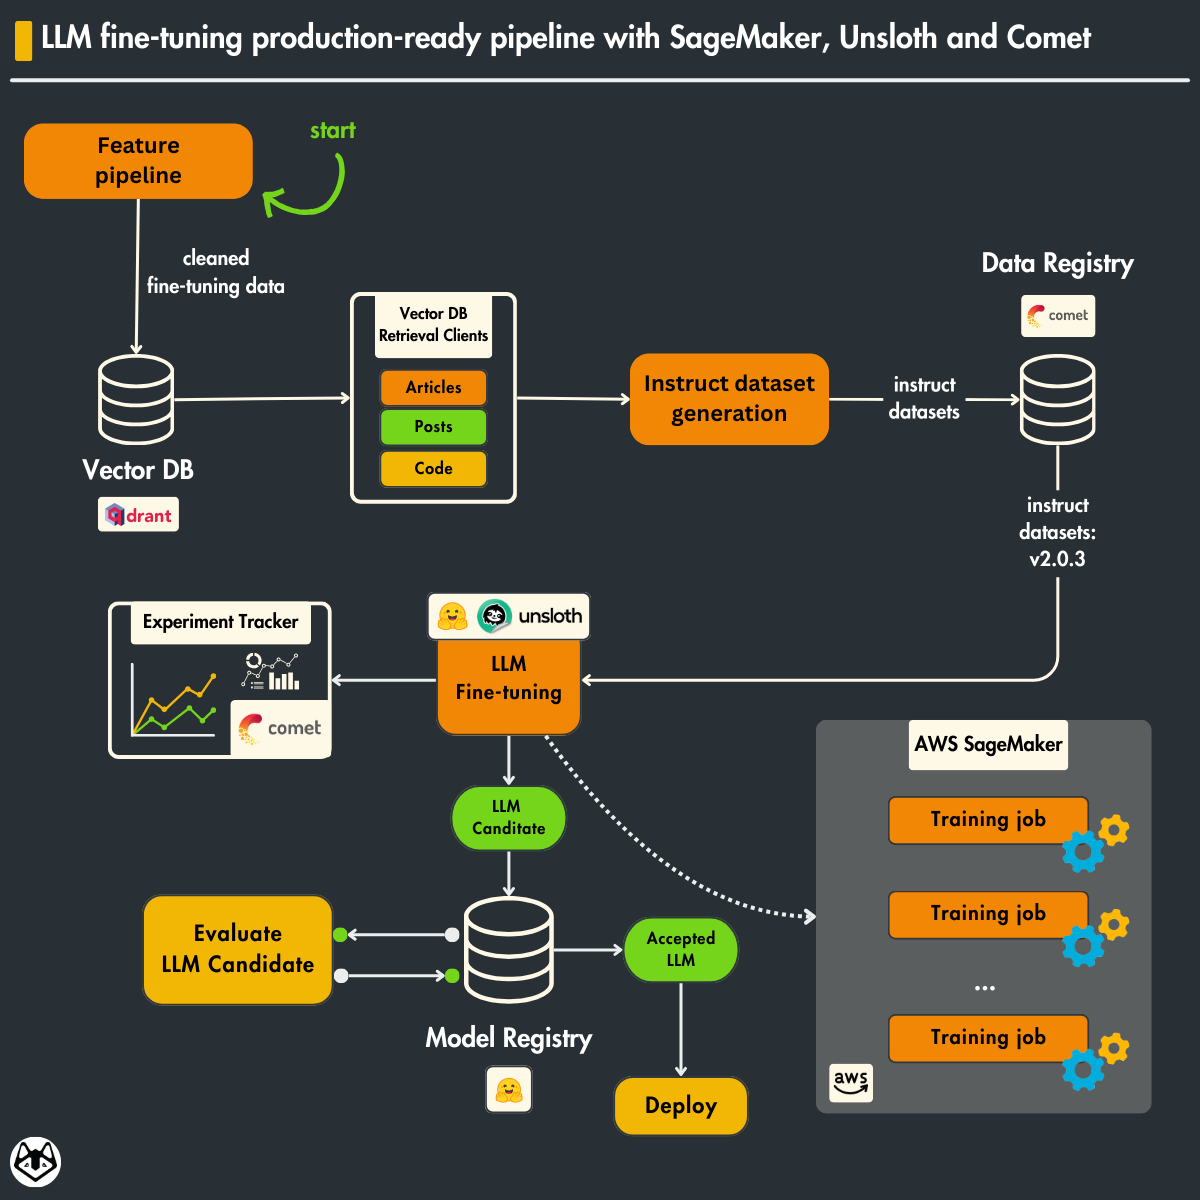
Table of Contents
- Loading the training dataset from the data registry
- Digging into SFT using Unsloth, TRL and Comet
- Saving the fine-tuned LLM to a model registry
- Scaling fine-tuning with AWS SageMaker
- Running the training pipeline on AWS SageMaker
1. Loading the training dataset from the data registry
In Lesson 6, we taught you how to generate an instruct fine-tuning dataset from raw custom data collected from various socials.
Ultimately, we stored and versioned the fine-tuning dataset into a data registry powered by Comet ML. The data registry uses artifacts to track large files and metadata such as tags, versions, and dataset size.
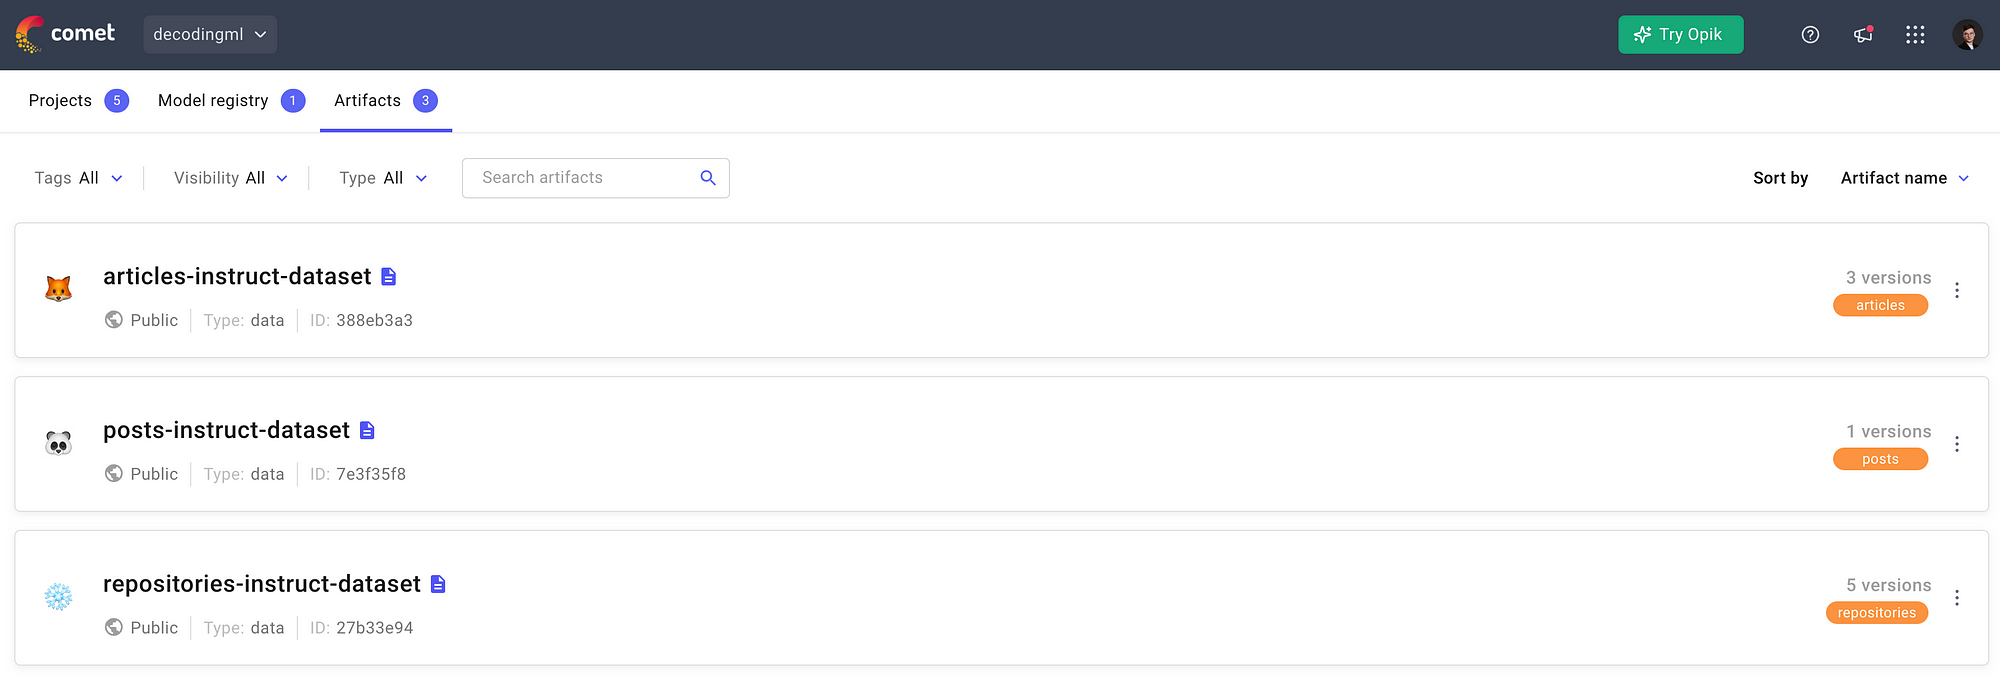
You can observe all the available artifacts from Comet ML in Figure 2.
Also, we made our artifacts publicly available, so you can take a look, play around with them, and even use them to fine-tune the LLM in case you don’t want to compute them yourself:
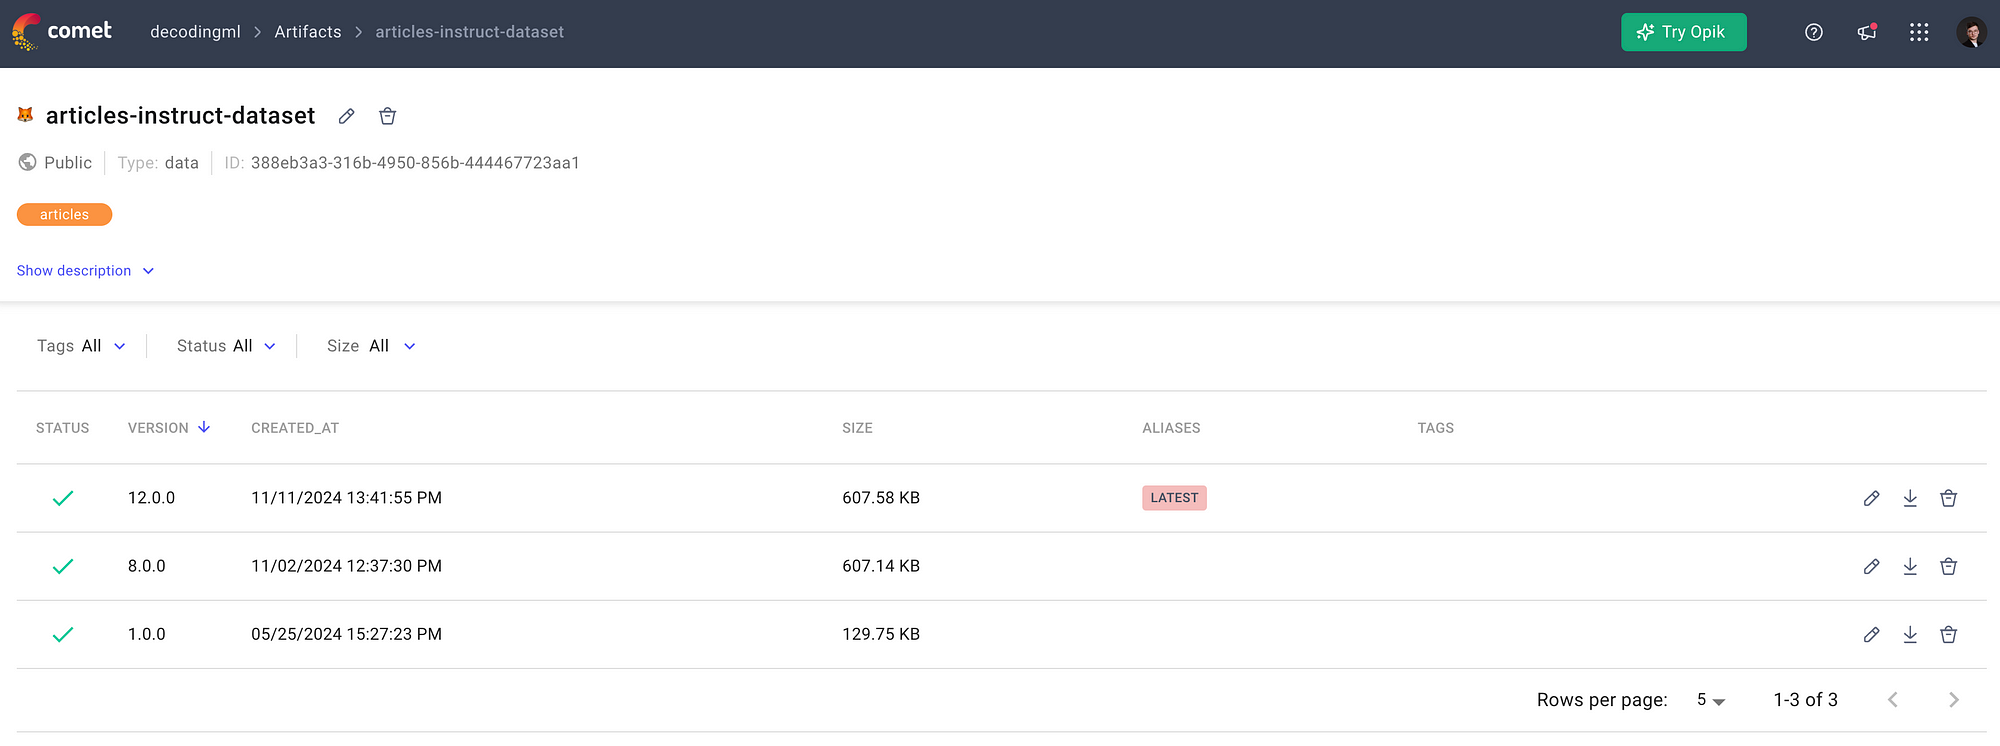
For example, in Figure 3, you can observe what our articles-instruct-dataset artifact looks like. It has 3 versions available, while the latest one is version 12.0.0.
By versioning your fine-tuning data, you ensure lineage, which means you always know what data you train your model on. A critical aspect of ensuring reproducibility which is one of the pillars of MLOps.
How can we work with these artifacts?
If you are familiar with working with HuggingFace datasets, you will see Comet artifacts are similar. Conceptually, they are the same thing, but Comet allows you to quickly build a private data registry on top of your private data.
Let’s dig into the code to see how they work.
 class DatasetClient:
    def __init__(
        self,
        output_dir: Path = Path("./finetuning_dataset"),
    ) -> None:
        self.output_dir = output_dir
        self.output_dir.mkdir(parents=True, exist_ok=True)
First, we define a DatasetClient class. It creates a dedicated directory for storing our downloaded datasets.
 def download_dataset(self, dataset_id: str, split: str = "train") -> Dataset:
      assert split in ["train", "test"], "Split must be either 'train' or 'test'"

      if "/" in dataset_id:
          tokens = dataset_id.split("/")
          assert (
              len(tokens) == 2
          ), f"Wrong format for the {dataset_id}. It should have a maximum one '/' character following the next template: 'comet_ml_workspace/comet_ml_artiface_name'"
          workspace, artifact_name = tokens
          experiment = Experiment(workspace=workspace)
      else:
          artifact_name = dataset_id
          experiment = Experiment()

      artifact = self._download_artifact(artifact_name, experiment)
      asset = self._artifact_to_asset(artifact, split)
      dataset = self._load_data(asset)

      experiment.end()

      return dataset
This is our primary entry point method — a high-level interface that orchestrates the entire dataset download process. It handles workspace parsing, validates inputs, and coordinates the three main steps: downloading, asset extraction, and data loading.
  def _download_artifact(self, artifact_name: str, experiment) -> Artifact:
      try:
          logged_artifact = experiment.get_artifact(artifact_name)
          artifact = logged_artifact.download(self.output_dir)
      except Exception as e:
          print(f"Error retrieving artifact: {str(e)}")
          raise

      print(f"Successfully downloaded  {artifact_name} at location {self.output_dir}")
      return artifact
This section manages the actual download of artifacts from Comet. It includes error handling and logging to ensure smooth data retrieval operations.
  def _artifact_to_asset(self, artifact: Artifact, split: str) -> ArtifactAsset:
      if len(artifact.assets) == 0:
          raise RuntimeError("Artifact has no assets")
      elif len(artifact.assets) != 2:
          raise RuntimeError(
              f"Artifact has more {len(artifact.assets)} assets, which is invalid. It should have only 2."
          )

      print(f"Picking split = '{split}'")
      asset = [asset for asset in artifact.assets if split in asset.logical_path][0]
      return asset
Here, we handle the validation and extraction of specific dataset splits (train/test) from our artifacts. It ensures we work with the correct data partitions and maintains data integrity.
 def _load_data(self, asset: ArtifactAsset) -> Dataset:
      data_file_path = asset.local_path_or_data
      with open(data_file_path, "r") as file:
          data = json.load(file)

      dataset_dict = {k: [str(d[k]) for d in data] for k in data[0].keys()}
      dataset = Dataset.from_dict(dataset_dict)

      print(
          f"Successfully loaded dataset from artifact, num_samples = {len(dataset)}",
      )

      return dataset
The final piece transforms our raw data into a HuggingFace Dataset object well-supported within the LLM tooling ecosystem, such as TRL, which we will use for fine-tuning.
What does our data look like?
We have ~300 training samples stored in our Comet ML artifacts that follow the structure below:
 [
...
 {
    "instruction": "Describe the old architecture of the RAG feature pipeline and its robust design principles.",
    "content": "Our goal is to help enterprises put vectors at the center of their\n> data & compute infrastructure, to build smarter and more reliable\n> software._\n\nTo conclude, Superlinked is a framework that puts the vectors in the center of\ntheir universe and allows you to:\n\n  * chunk and embed embeddings;\n\n  * store multi-index vectors in a vector DB;\n\n  * do complex vector search queries on top of your data. Screenshot from Superlinkeds landing page\n\n* * *\n\n## **2\\. The old architecture of the RAG feature pipeline**\n\nHere is a quick recap of the critical aspects of the architecture of the RAG\nfeature pipeline presented in the 4th lesson of the LLM Twin course. _We are working with**3 different data categories** :_\n\n  * posts (e.g., LinkedIn, Twitter)\n\n  * articles (e.g., Medium, Substack, or any other blog)\n\n  * repositories (e.g., GitHub, GitLab)\n\nEvery data category has to be preprocessed differently. For example, you want\nto chunk the posts into smaller documents while keeping the articles in bigger\nones. _The**solution** is based on **CDC** , a **queue,** a **streaming engine,**\nand a **vector DB:**_\n\n-> The raw data is collected from multiple social platforms and is stored in MongoDB. (Lesson 2)\n\n  CDC adds any change made to the MongoDB to a RabbitMQ queue (Lesson 3). the RabbitMQ queue stores all the events until they are processed. The Bytewax streaming engine reads the messages from the RabbitMQ queue and\ncleans, chunks, and embeds them. The processed data is uploaded to a Qdrant vector DB. The old feature/streaming pipeline architecture that was presented in Lesson\n4. ### **Why is this design robust?**\n\nHere are 4 core reasons:\n\n  1. The **data** is **processed** in **real-time**. 2. **Out-of-the-box recovery system:** If the streaming pipeline fails to process a message, it will be added back to the queue\n\n  3. **Lightweight:** No need for any diffs between databases or batching too many records\n\n  4."
  },
...
]
300 samples are not enough for SFT. Usually, you need somewhere between 10k and 100k instruct-answer pairs.
However, they are sufficient to teach you an end-to-end LLM architecture that can easily support 100k datasets if you want to use it and adapt it to your needs.
2.Digging into SFT using Unsloth, TRL and Comet
The next step is to define our fine-tuning strategy. We will do only an SFT step using LoRA to keep it simple and cost-effective.
We will use Unsloth and TRL to define our fine-tuning script.
Unsloth is the new kid on the block of fine-tuning LLMs, making training 2x faster and 60% more memory-efficient than directly HuggingFace.
This translates to faster experiments, which means more iterations, feedback, and novelty with lower costs.
Also, we will use Comet as our experiment tracker to log all our training metrics between multiple experiments, compare them, and pick the best one to push to production.
🔗 See a concrete example of an experiment tracker by checking out one of our experiments ←
Now, let’s dig into the code. Unsloth and TRL make it straightforward.
 ALPACA_TEMPLATE = """Below is an instruction that describes a task. Write a response that appropriately completes the request.

### Instruction:
{}

### Response:
{}"""
We will use the Alpaca format, which is expected by Llama models, to format our instruct dataset into prompts.
 def finetune(
    model_name: str,
    output_dir: str,
    dataset_id: str,
    max_seq_length: int = 2048,
    load_in_4bit: bool = False,
    lora_rank: int = 32,
    lora_alpha: int = 32,
    lora_dropout: float = 0.0,
    target_modules: List[str] = [
        "q_proj", "k_proj", "v_proj",
        "up_proj", "down_proj", "o_proj",
        "gate_proj",
    ],
    chat_template: str = "chatml",
    learning_rate: float = 3e-4,
    num_train_epochs: int = 3,
    per_device_train_batch_size: int = 2,
    gradient_accumulation_steps: int = 8,
    is_dummy: bool = True,
) -> tuple:
Next, we define the fine-tuning function and its parameters, including model configurations, LoRA parameters, and training hyperparameters.
   model, tokenizer = load_model(
          model_name, max_seq_length, load_in_4bit,
          lora_rank, lora_alpha, lora_dropout,
          target_modules, chat_template,
      )
      EOS_TOKEN = tokenizer.eos_token
      print(f"Setting EOS_TOKEN to {EOS_TOKEN}")

      if is_dummy is True:
          num_train_epochs = 1
          print(f"Training in dummy mode. Setting num_train_epochs to '{num_train_epochs}'")
          print(f"Training in dummy mode. Reducing dataset size to '400'.")
Next, we load the model and tokenizer and handle dummy mode settings for quick testing.
 def format_samples_sft(examples):
        text = []
        for instruction, output in zip(
            examples["instruction"], examples["content"], strict=False
        ):
            message = ALPACA_TEMPLATE.format(instruction, output) + EOS_TOKEN
            text.append(message)
        return {"text": text}
This inner function handles the formatting of training examples into the desired template structure.
 dataset_client = DatasetClient()
    custom_dataset = dataset_client.download_dataset(dataset_id=dataset_id)
    static_dataset = load_dataset("mlabonne/FineTome-Alpaca-100k", split="train[:10000]")
    dataset = concatenate_datasets([custom_dataset, static_dataset])
    if is_dummy:
        dataset = dataset.select(range(400))
    print(f"Loaded dataset with {len(dataset)} samples.")

    dataset = dataset.map(
        format_samples_sft, batched=True, remove_columns=dataset.column_names
    )
    dataset = dataset.train_test_split(test_size=0.05)

    print("Training dataset example:")
    print(dataset["train"][0])
Next, we handle dataset loading, combining custom and static datasets, and preprocessing the data.
As we don’t have enough fine-tuning data, we enrich our custom dataset with a standard fine-tuning dataset to keep the SFT training step stable and avoid breaking the model.
 trainer = SFTTrainer(
          model=model,
          tokenizer=tokenizer,
          train_dataset=dataset["train"],
          eval_dataset=dataset["test"],
          dataset_text_field="text",
          max_seq_length=max_seq_length,
          dataset_num_proc=2,
          packing=True,
          args=TrainingArguments(
              learning_rate=learning_rate,
              num_train_epochs=num_train_epochs,
              per_device_train_batch_size=per_device_train_batch_size,
              gradient_accumulation_steps=gradient_accumulation_steps,
              fp16=not is_bfloat16_supported(),
              bf16=is_bfloat16_supported(),
              logging_steps=1,
              optim="adamw_8bit",
              weight_decay=0.01,
              lr_scheduler_type="linear",
              per_device_eval_batch_size=per_device_train_batch_size,
              warmup_steps=10,
              output_dir=output_dir,
              report_to="comet_ml",
              seed=0,
          ),
      )

      trainer.train()

      return model, tokenizer
This final section sets up the SFT (Supervised Fine-Tuning) trainer with all necessary parameters and executes the training process.
To enable experiment tracking with Comet ML is as simple as setting the report_to=”comet_ml” parameter to the TrainingArguments class and having the `COMET_API_KEY`, `COMET_WORKSPACE` and `COMET_PROJECT` environment variables loaded up in memory.
Let’s dig further into how the model is defined using Unsloth.
 def load_model(
    model_name: str,
    max_seq_length: int,
    load_in_4bit: bool,
    lora_rank: int,
    lora_alpha: int,
    lora_dropout: float,
    target_modules: List[str],
    chat_template: str,
) -> tuple:
The load_model function takes several essential parameters:
- model_name: The identifier of the pre-trained model (e.g., “meta-llama/Meta-Llama-3.1–8B”)
- max_seq_length: Maximum sequence length for input tokens
- load_in_4bit: Boolean flag for 4-bit quantization
- lora_rank, lora_alpha, lora_dropout: LoRA (Low-Rank Adaptation) parameters
- target_modules: List of model layers to apply LoRA to
- chat_template: The conversation format template to use
  model, tokenizer = FastLanguageModel.from_pretrained(
      model_name=model_name,
      max_seq_length=max_seq_length,
      load_in_4bit=load_in_4bit,
  )
This step from the load_model() function loads the pre-trained model and its tokenizer using Unsloth’s FastLanguageModel.
The load_in_4bit parameter is particularly interesting as it enables 4-bit quantization, significantly reducing the model’s memory footprint while maintaining good performance.
   model = FastLanguageModel.get_peft_model(
      model,
      r=lora_rank,
      lora_alpha=lora_alpha,
      lora_dropout=lora_dropout,
      target_modules=target_modules,
  )
Here’s where the magic of LoRA happens. Instead of fine-tuning all model parameters, LoRA adds small trainable rank decomposition matrices to specific layers (defined in target_modules). This makes fine-tuning much more efficient in terms of memory and computation.
- lora_rank (r): Determines the rank of the LoRA update matrices.
- lora_alpha: Scaling factor for the LoRA updates.
- lora_dropout: Adds regularization to prevent overfitting.
  tokenizer = get_chat_template(
      tokenizer,
      chat_template=chat_template,
  )
Finally, we configure the tokenizer with a specific chat template. This ensures that the model understands the structure of conversations during training and inference. Standard templates include “chatml” (ChatML format) or other custom formats.
This loading pipeline is crucial for efficient fine-tuning because it:
- Enables memory-efficient training through 4-bit quantization.
- Implements LoRA for parameter-efficient fine-tuning.
- Ensures consistent conversation formatting through chat templates.
Using this approach, you can fine-tune LLMs on consumer-grade hardware while achieving excellent results.
To dig deeper into the theory of fine-tuning with LoRA, consider checking out this article written by Maxime: Fine-tune Llama 3.1 Ultra-Efficiently with Unsloth [2].
3. Saving the fine-tuned LLM to a model registry
The same as storing, tracking and versioning your data in a data registry, we have to do it for our fine-tuned model by pushing it to a model registry.
A common strategy when working with open-source models is to use the Hugging Face model registry to store and share your models, which we will also do in this lesson.
 base_model_suffix = args.base_model_name.split("/")[-1]
sft_output_model_repo_id = f"{huggingface_workspace}/LLMTwin-{base_model_suffix}"

save_model(
        model,
        tokenizer,
        "model_sft",
        push_to_hub=True,
        repo_id=sft_output_model_repo_id,
    )
First, we compute the output model ID based on our Hugging Face workspace (e.g., pauliusztin) and the new model name. Out of simplicity, we prefixed the base model name with “LLMTwin”.
 def save_model(
    model: Any,
    tokenizer: Any,
    output_dir: str,
    push_to_hub: bool = False,
    repo_id: Optional[str] = None,
) -> None:
    model.save_pretrained_merged(output_dir, tokenizer, save_method="merged_16bit")

    if push_to_hub and repo_id:
        model.push_to_hub_merged(repo_id, tokenizer, save_method="merged_16bit")
We save the model locally and push it to Hugging Face, as seen in Figure 3.
Further, you can load a specific version of the model from the model registry for evaluation or serving.
Almost all ML platforms offer a model registry, such as Comet, W&B, Neptune and more, but HuggingFace is a common choice.
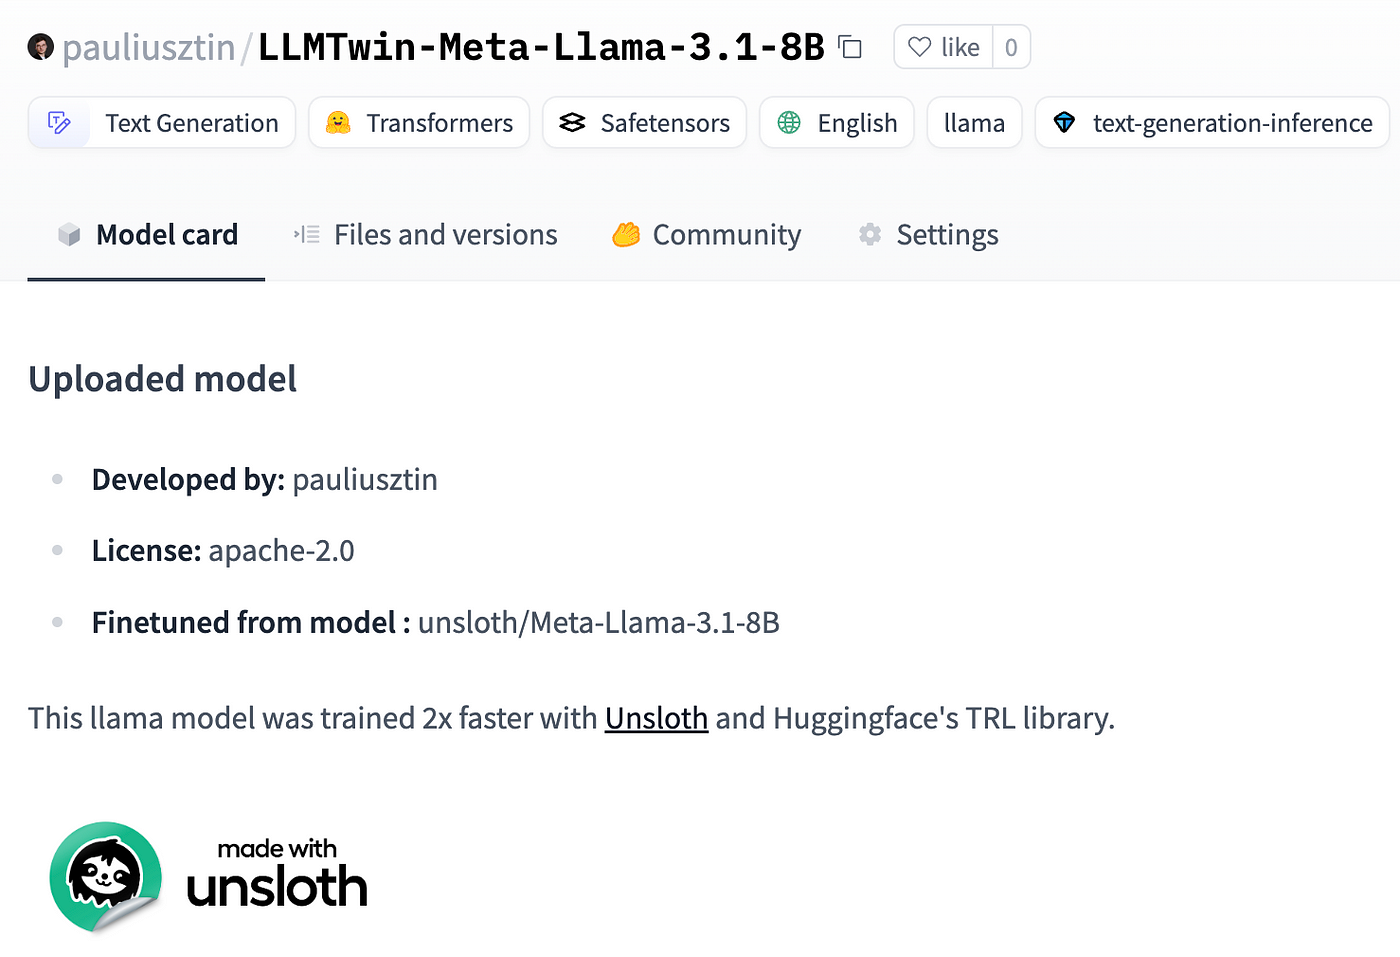
For example, the beauty of model registries is that, in case you haven’t fine-tuned your LLMTwin, you can use ours to finish the course:
→ Link to our pauliusztin/LLMTwin-Meta-Llama-3.1–8B model.
→ Full code: the finetune.py script.
4.Scaling fine-tuning with AWS SageMaker
So far, we have walked you through the fine-tuning script. A standard approach is to run it on Google Colab locally or using similar approaches based on Notebooks, but what if we want to scale or automate the training?
A 7–8B LLM could fit on a Google Colab machine while using LoRA/QLoRA, but it can get trickier for larger models.
Another issue is that when working with open-source datasets, it’s easy to work with Google Colab, but what if you work with terabytes or petabytes of data?
Here is where tools such as AWS SageMaker kick in. They allow you to hook your fine-tuning script to GPU clusters running on AWS and provide robust access to datasets of various sizes (public or private) powered by S3 (you could host your Comet ML artifacts on S3).
Code-wise, SageMaker makes it easy to set everything up, as seen in the code snippet below, where we:
- Locate the requirements.txt file with the Python dependencies used for training.
- Grab your Hugging Face user.
- Define the SageMaker job using a wrapper dedicated to training jobs that use Hugging Face. They are Docker images preinstalled with the transformer and torch libraries.
- Kick off the training.
Beautiful and easy.
 from huggingface_hub import HfApi
from sagemaker.huggingface import HuggingFace


finetuning_dir = Path(__file__).resolve().parent
finetuning_requirements_path = finetuning_dir / "requirements.txt"

def run_finetuning_on_sagemaker(
    num_train_epochs: int = 3,
    per_device_train_batch_size: int = 2,
    learning_rate: float = 3e-4,
    is_dummy: bool = False,
) -> None:
    if not finetuning_requirements_path.exists():
        raise FileNotFoundError(
            f"The file {finetuning_requirements_path} does not exist."
        )

    api = HfApi()
    user_info = api.whoami(token=settings.HUGGINGFACE_ACCESS_TOKEN)
    huggingface_user = user_info["name"]
    logger.info(f"Current Hugging Face user: {huggingface_user}")

    hyperparameters = {
        "base_model_name": settings.HUGGINGFACE_BASE_MODEL_ID,
        "dataset_id": settings.DATASET_MODEL_ID,
        "num_train_epochs": num_train_epochs,
        "per_device_train_batch_size": per_device_train_batch_size,
        "learning_rate": learning_rate,
        "model_output_huggingface_workspace": huggingface_user,
    }
    if is_dummy:
        hyperparameters["is_dummy"] = True

    # Create the HuggingFace SageMaker estimator
    huggingface_estimator = HuggingFace(
        entry_point="finetune.py",
        source_dir=str(finetuning_dir),
        instance_type="ml.g5.2xlarge",
        instance_count=1,
        role=settings.AWS_ARN_ROLE,
        transformers_version="4.36",
        pytorch_version="2.1",
        py_version="py310",
        hyperparameters=hyperparameters,
        requirements_file=finetuning_requirements_path,
        environment={
            "HUGGING_FACE_HUB_TOKEN": settings.HUGGINGFACE_ACCESS_TOKEN,
            "COMET_API_KEY": settings.COMET_API_KEY,
            "COMET_WORKSPACE": settings.COMET_WORKSPACE,
            "COMET_PROJECT_NAME": settings.COMET_PROJECT,
        },
    )

    # Start the training job on SageMaker.
    huggingface_estimator.fit()
The hyperparameters dictionary will be sent to the fine-tuning script as CLI arguments, while the environment dictionary will be set as environment variables. That’s why we send only the credentials through the environment argument.
As we train an 8B LLM, we managed to fit the training into a single “ml.g5.2xlarge” instance, which has a single NVIDIA A10G GPU with 24 VRAM, which costs ~2$ / hour.
But the catch is that this is possible only because we fine-tune using Unsloth, which reduces our memory consumption. Without it, we fit the training job only on a “ml.g5.12xlarge” instance with x4 A10G GPUs, which cost ~9$ / hour.
So, yes, Unsloth is incredible!
That is a 77.77% reduction in costs (and we are not even considering that Unsloth experiments run faster due to the framework itself and less IO overhead as we use a single GPU).
More on SageMaker pricing ←
 from pydantic_settings import BaseSettings, SettingsConfigDict


class Settings(BaseSettings):
    model_config = SettingsConfigDict(env_file=ROOT_DIR, env_file_encoding="utf-8")

    HUGGINGFACE_BASE_MODEL_ID: str = "meta-llama/Meta-Llama-3.1-8B"
    HUGGINGFACE_ACCESS_TOKEN: str | None = None

    COMET_API_KEY: str | None = None
    COMET_WORKSPACE: str | None = None
    COMET_PROJECT: str = "llm-twin"

    DATASET_ID: str = "decodingml/articles-instruct-dataset"

    # AWS Authentication
    AWS_REGION: str = "eu-central-1"
    AWS_ACCESS_KEY: str | None = None
    AWS_SECRET_KEY: str | None = None
    AWS_ARN_ROLE: str | None = None
In our settings object (populated by the .env file), we have to set the base model_id, the dataset_id (loaded from Comet artifacts), and credentials for Hugging Face, Comet, and AWS.
→ Full code: the run_on_sagemaker.py script
5.Running the training pipeline on AWS SageMaker
To run the fine-tuning job, first, you must create an IAM execution role used by AWS SageMaker to access other AWS resources. This is standard practice when working with SageMaker.
make create-sagemaker-execution-roleYou must add this to your .env file as your AWS_ARN_ROLE env var. Thus, your .env file should look something like this:
 QDRANT_APIKEY=...

# AWS Authentication
AWS_ARN_ROLE=...
AWS_REGION=eu-central-1
AWS_ACCESS_KEY=...
AWS_SECRET_KEY=...
Then, you can kick off a dummy training that uses less data and epochs by running:
make start-training-pipeline-dummy-modeAnd the entire training by running:
make start-training-pipeline After you call any training commands, your CLI should look similar to Figure 5.

After the EC2 machine is provisioned for your training job, your CLI should look similar to Figure 6.

After the training image is downloaded, your requirements are installed from the requirements.txt file, and the fine-tuning script starts running.
Find step-by-step instructions on installing and running the entire course in our INSTALL_AND_USAGE document from the repository.
Conclusion
In this lesson, you’ve got your hands dirty with fine-tuning an open-source LLM from HuggingFace using Unsloth, TRL.
Also, you’ve learned why storing, versioning and using your data from a data registry (e.g., using Comet artifacts) is critical for reproducibility.
Ultimately, you’ve seen how easy it is to automate your training processes using AWS SageMaker.
Continue the course with Lesson 8 on evaluating the fine-tuned LLM and RAG pipeline using Opik.
🔗 Consider checking out the GitHub repository [1] and support us with a ⭐️
References
Literature
[1] Decodingml. (n.d.). GitHub — decodingml/llm-twin-course. GitHub. https://github.com/decodingml/llm-twin-course[2] Maxime Labonne (2024), Fine-tune Llama 3.1 Ultra-Efficiently with Unsloth, Maxime’s Labonne blog. https://mlabonne.github.io/blog/posts/2024-07-29_Finetune_Llama31.html
Images
If not otherwise stated, all images are created by the author.

