How To Use Comet At Different Stages of ML Projects
Machine learning (ML) projects are usually complicated and include several stages, from data discovery to model implementation. The ability to track, compare, and optimize experiments and models is crucial for achieving good outcomes from ML models.
Comet is a robust platform that provides comprehensive functionality to streamline these stages. It helps to manage your models during experimentation and monitor them in a production environment. This article will dive into steps to see how you can use Comet at different stages of ML projects.
An ML project majorly includes five big stages:
- Data Exploration
- Model Development
- Model Optimation
- Model Deployment
- Collaboration and Documentation
Before jumping into anything, if you don’t have Comet in your environment, you can install it using the following command.
pip install comet_ml
Once you finish the installation, head to comet.com and create an account for free.
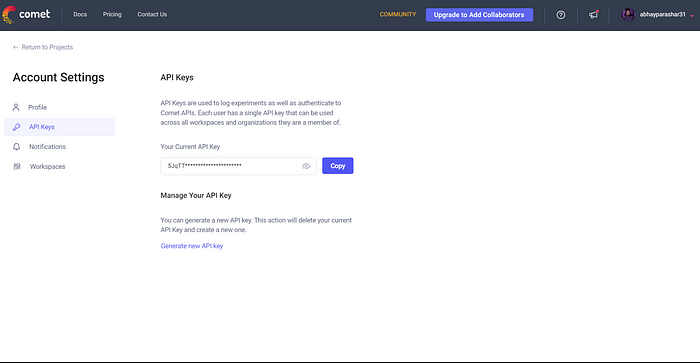
In the top right corner, click on your profile, head to Account Settings, and click on API Keys. Copy your API key and save it somewhere safe.

Let’s initialize our Comet experiment and move further in the article.
from comet_ml import Experiment
experiment = Experiment(
              api_key="Your Secrect API key",
              project_name="project name",
              workspace="work_space name"
            )
1. Data Exploration Using Comet
Data Exploration is one of the initial steps of any ML project, as it helps you gain more insight into your data and its characteristics and hidden patterns. Data Exploration also enables you to make better decisions during subsequent stages of the project. Comet provides different methods to facilitate the process of data exploration.
Logging Dataset Statistics
- It’s essential to understand the data you are working with comprehensively. Comet provides a set of functionalities that allow you to log crucial statistics about your dataset, such as the number of samples, the distribution of values, or the relationships between features.
- You can use
log_dataset_has()function to log the hash of your dataset. It will help you track changes in the dataset and determine whether your training runs use the same training data for each epoch.
import comet_ml

# Initialize a CometML experiment
experiment = comet_ml.Experiment(project_name="data-exploration", workspace="your-workspace")

# Log dataset statistics
experiment.log_dataset_hash(path="path/to/dataset")
Tracking Data Distribution
- A good understanding of data is crucial for feature engineering and model selection.
- Comet has a set of functions that help you visualize the distribution of different features and variables in your dataset.
import comet_ml
import matplotlib.pyplot as plt
import numpy as np

# Initialize a CometML experiment
experiment = comet_ml.Experiment(project_name="data-exploration", workspace="your-workspace")

# Simulated data
data = np.random.normal(loc=0, scale=1, size=1000)

# Log and visualize data distribution
experiment.log_histogram_3d(data, name="data_distribution")
experiment.display()
Also, you can use log_figure() for logging matplotlib graphs into Comet. There are some other functions as well that can be helpful for Data Exploration.
- Experiment.log_dataset_info: Used to log information about your dataset.
- Experiment.log_dataframe_profile: Log a Pandas DataFrame profile as an asset. Optionally, we can also log the data frame.
- Experiment.log_figure: Logs the global Pyplot figure or the passed one and uploads its SVG version to the backend.
2. Model Development Using Comet
Model development is one of the most crucial stages in ML projects, where you design, train, evaluate, and fine-tune your models. Comet provides different functions that make this whole process much more manageable.
Experiment Tracking
- Experiment tracking is the process of saving all experiment-related information that you care about for every experiment you run. It’s essential for reproducibility, optimization, troubleshooting, and data-driven decision-making.
- Comet allows you to track and log your experiment info for each iteration by utilizing different methods of
Experimentclass.
from comet_ml import Experiment

## Intialize ComeML experiment
experiment = Experiment(project_name="tracking-info", workspace="your-workspace")

## Log hyperparameters and configurations
experiment.log_parameters({"learning_rate": 0.001, "batch_size": 32})

## Log Model Version
experiment.log_model("my-model", model_directory="path/to/model")
Monitoring Model Metrics
- During the machine learning projects’ training and evaluation phase, monitoring model metrics to track performance and make good decisions is essential.
- Comet allows you to log different evaluation matrices like accuracy, loss, precision, recall, etc.
import comet_ml

# Initialize a CometML experiment
experiment = comet_ml.Experiment(project_name="model-development", workspace="your-workspace")

# Evaluation metrics
accuracy = ...  # Calculate accuracy

# Log metrics
experiment.log_metric("accuracy", accuracy)
There are many other functions that you can use to monitor different components of machine learning model development. You can find them here.
3. Model Optimization
Model optimization helps improve the performance and efficiency of your model by tuning hyperparameters. Comet provides:
Hyperparameter Tuning
- A hyperparameter is a parameter whose value controls the learning process. Hyperparameter tuning means finding a set of optimal parameters for your model.
import comet_ml
from sklearn.model_selection import GridSearchCV
from sklearn import tree
from sklearn.datasets import load_iris
from sklearn.model_selection import train_test_split

# Load the dataset
X, y = load_iris(return_X_y=True)
X_train, X_test, y_train, y_test = train_test_split(X, y, test_size=0.2, random_state=42)

# Initialize a CometML experiment
experiment = comet_ml.Experiment(project_name="hyperparameter-optimization", workspace="your-workspace")

# Define the search space for hyperparameters
param_grid = {
    "C": [0.1, 1.0, 10.0],
    "gamma": [0.001, 0.01, 0.1],
    "kernel": ["linear", "rbf"]
}

## Log Param Grid
experiment.log_parameters(param_grid)

# Initialize the model with default hyperparameters
model = tree.DecisionTreeClassifier()

# Perform hyperparameter optimization
optimizer = GridSearchCV(model, param_grid, cv=3, n_jobs=-1)
optimizer.fit(X_train, y_train)

# Log the best hyperparameters and evaluation metric
best_params = optimizer.best_params_
best_score = optimizer.best_score_

# Log best params and best score
experiment.log_parameters(best_params)
experiment.log_metric("accuracy", best_score)
Compare Model Architecture
- Comet makes it easy to keep a record and monitor various model architectures as you fine-tune them, enabling you to discover the most impactful design. By experimenting with different combinations of hyperparameters in neural networks, you can determine the optimal configuration that yields the greatest accuracy and performance. This exploration process becomes more efficient with Comet’s tracking capabilities.
import comet_ml
from tensorflow import keras
from sklearn.model_selection import train_test_split
from sklearn.metrics import accuracy_score
import numpy as np

# Load and preprocess the dataset
X, y = load_dataset()  ## Custom functionf for loading dataset
X_train, X_test, y_train, y_test = train_test_split(X, y, test_size=0.2)

# Initialize a CometML experiment
experiment = comet_ml.Experiment(project_name="model-architecture-search", workspace="your-workspace")

# Define the model architecture search space
model_architectures = [
    {"layers": [64, 32], "activation": "relu"},
    {"layers": [128, 64, 32], "activation": "relu"},
    {"layers": [32, 16], "activation": "sigmoid"},
    {"layers": [128, 64, 32, 16], "activation" : "relu"},
]

# Iterate through the model architectures
for architecture in model_architectures:

    # Initialize the model
    model = keras.Sequential()

    # Build the model with the selected architecture
    for units in architecture["layers"]:
        model.add(keras.layers.Dense(units, activation=architecture["activation"]))

    # Compile the model
    model.compile(optimizer="adam", loss="categorical_crossentropy", metrics=["accuracy"])

    # Train the model
    model.fit(X_train, y_train, epochs=10, batch_size=32, validation_data=(X_test, y_test))

    # Evaluate the model
    y_pred = np.argmax(model.predict(X_test), axis=1)
    accuracy = accuracy_score(y_test, y_pred)

    # Log the model architecture and evaluation metric
    experiment.log_parameter("layers", architecture["layers"])
    experiment.log_parameter("activation", architecture["activation"])
    experiment.log_metric("accuracy", accuracy)
4. Model Deployment
Model deployment is a final end-user step where you connect your machine learning models with a web app and make it available for real-world testing.
You can use Comet as a database to store all your predictions and user interactions to perform analysis later to improve the algorithm and other aspects of your model.
Note: Comet can not be used to deploy a model, however, you can use it as a database to store your predictions and logs.
import comet_ml
import streamlit as st
import joblib

# Load the serialized model
model = joblib.load('path_to_model.joblib')

# Initialize a CometML experiment
experiment = comet_ml.Experiment(project_name='model-deployment', workspace='your-workspace')

# Define the prediction function
def predict(data):
    # Processing (if necessary)
    preprocessed_data = preprocess(data) ## preprocess() is a user defined function for processing user input into a proper format

    # Predictions
    predictions = model.predict(preprocessed_data)

    # Log predictions to CometML
    experiment.log_text(predictions)

    return predictions

# Streamlit app
def main():
    st.title('Streamlit App')
    st.write('Enter your input below:')

    # Form
    input_data = {}
    for feature in features:
        input_data[feature] = st.number_input(f'Enter {feature}:')

    # Make predictions
    if st.button('Predict'):
        predictions = predict([list(input_data.values())])
        st.write('Predictions:', predictions)

if __name__ == '__main__':
    main()
5. Collaboration and Documentation
Collaboration and documentation are essential aspects of ML projects. They enable teams to collaborate on a single project, share their knowledge, reproduce experiments, and ensure project transparency. Comet is built for this, offering many features that facilitate model collaboration and documentation.
Comet allows you to share your experiments with team members, which lets them view, comment, and collaborate on your experiments. Comet offers multiple straightforward ways to share experiments:
◾Share Experiment URL: Every experiment in Comet is assigned a unique URL. You can copy the URL and share your team members via email, message, or project management tools. Team members can access the experiment by visiting their browser’s shared URL.
◾Access to Workspace: A Workspace in Comet is a dedicated environment for team collaboration. To invite your team members to your workspace, go to Comet web interface > navigate to the Workspace section and add their email addresses. (This option is only available for premium members.)
◾Export and Share: If you want to share your experiment info offline, you can easily export it as a PDF.
# Add experiment description and tags
experiment.set_name('Monkey Breed Classification')
experiment.add_tags(['Monkey Breed Data', 'Transfer Learning'])
experiment.set_description('This experiment classify monkey breeds.')
experiment.add_link("Google Drive", "https://drive.google.com")


# Share the experiment link with team members
experiment_url = experiment.url
print(f"Experiment URL: {experiment_url}")


