Dataset Tracking with Comet ML Artifacts
Projects are often extensive and have intricacies that need to be more intuitive for a single individual to track. It is the same in machine learning and data science projects.
It is necessary to keep track of many aspects of a given project. A dataset is one of the most important but easily overlooked aspects of a machine learning project. As one engages in feature engineering and data cleaning, it is easy to forget that one needs to keep track of the changes to understand where improvements or declines in performance came from.
In this article, I intend to show how someone can keep track of changes with Comet ML’s dataset storage feature: Artifacts. Let’s begin.
Requirements
There are a few requirements that you’ll need to perform the following project. They are:
- A Comet ML account. You can get one here.
- A Python 3.9+ installation.
- An IDE; preferably Visual Studio Code or Jupyter Notebooks.
- The following python libraries: comet_ml, Scikit-learn, and Pandas.
- The passion to learn everything in this article.
Project
The dataset for my project will be one that might require substantial changes through data cleaning as most real-world datasets would require. This is important as we can monitor multiple changes throughout the lifetime of this given project. It will also mimic the challenges that a real-life project could have.
One particularly good dataset that simulates real-life problems in data is the famous Kaggle Titanic Dataset. This dataset is messy, full of noise and has many places that are missing data. It is important to experience such problems as they reflect a lot of the issues that a data practitioner is bound to experience in a business environment. Here is the link to the page with both training and test datasets.
We first get a snapshot of our data by visually inspecting it and also performing minimal Exploratory Data Analysis just to make this article easier to follow through. In a real-life scenario you can expect to do more EDA, but for the sake of simplicity we’ll do just enough to get a sense of the process.
import pandas as pd
from sklearn.model_selection import train_test_split

df = pd.read_csv("/train.csv")
df.head()

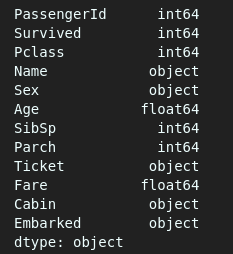
The code written gives the result above. We can see the initial form of our data and what it looks like. We can go further and check if it has any null values and what datatype each column is.
#Gives us the datatypes of different features
df.dtypes

#Gives us the total number of null values per column
df.isnull().sum()

Finally, we can have a look at the general scope of the data to understand whether the missing values affect all the data extensively by using the describe() method.
df.describe()

We can see that there are 891 entries in total and the “Cabin” column has 687 nulls while the “Age” column has 177. The next step will be performing train-test splits to come up with validation data. After that, we will perform feature engineering in order to come up with the first version of our dataset that will be stored in an Artifact.
First Dataset Version
There are a few steps we will follow: We will perform the train-test split first and then we will perform one-hot encoding for categorical features. Finally, we will fill null values in the remaining features with medians.
#performing train-test split and one-hot encoding
from sklearn.model_selection import train_test_split
from sklearn.compose import ColumnTransformer
from sklearn.impute import SimpleImputer
from sklearn.preprocessing import OneHotEncoder
import numpy as np

#Dropping two rows where "Embarked" has nulls
df = df.dropna(subset="Embarked")

y = df["Survived"]
X = df.drop(columns=["Survived"],  axis=0)


X_train, X_val, y_train, y_val = train_test_split(X, y, test_size=0.2, random_state=0)

#Columns needed in transformations
columns = ["PassengerId","Ticket", "Name", "Cabin"]
categorical_columns = ["Sex", "Embarked"]

#Imputing pipeline
impute_median = SimpleImputer(missing_values=np.nan, strategy='median')

#Transformation pipeline for training and validation data
df_transformations = [('impute_median', impute_median, ["Age"]),
                      ('one-hot-encoder', OneHotEncoder(sparse_output=False), categorical_columns),
                      ('drop', 'drop', columns)]


df_pipeline = ColumnTransformer(df_transformations, remainder='passthrough')
df_pipeline.set_output(transform='pandas')

#Transforming X_train and X_val
X_train_transformed = df_pipeline.fit_transform(X_train)
X_val_transformed = df_pipeline.fit_transform(X_val)
The above code will give us adequately cleaned data that we can pass through a model for prediction and accuracy. We can check the outcome of the preprocessing by running:
X_train_transformed.head()
The result will show that our desired transformations have been successful:

We are now a few steps away from storing our dataset in an Artifact in order to keep track of different versions.
Isolating difficult data samples? Comet can do that. Learn more with our PetCam scenario and discover Comet Artifacts.
Training a Model and Making an Artifact
Now that we have our training data and validation data preprocessed, we can use them for training the model and checking for accuracy. We will keep track of the model’s accuracy through a Comet ML experiment that will be directly linked to the Artifact that we will create. All these can be performed in a few steps.
from sklearn.ensemble import RandomForestClassifier
from comet_ml import Artifact, Experiment
from sklearn.metrics import mean_squared_error, accuracy_score

#initializing Experiment to track model accuracy
experiment = Experiment(api_key = "Personal API key",
                        project_name = "Artifact_Learning")
#model to fit and predict
model = RandomForestClassifier()
model.fit(X_train_transformed, y_train)
y_pred = model.predict(X_val_transformed)
acc = accuracy_score(y_val, y_pred)

#Logging model accuracy
experiment.log_metric("accuracy", acc)
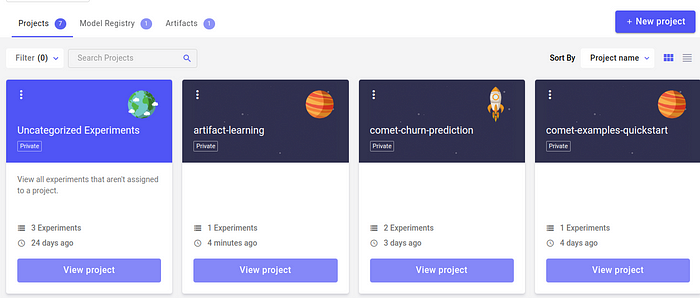
The above code will initialize a project called “artifact-learning” on the “Project” page that will have an experiment with your accuracy score as you have decided to log that with the “log_metric()” method. You could log additional details such as hyperparameters if your model has any to keep the work as meticulous as possible.

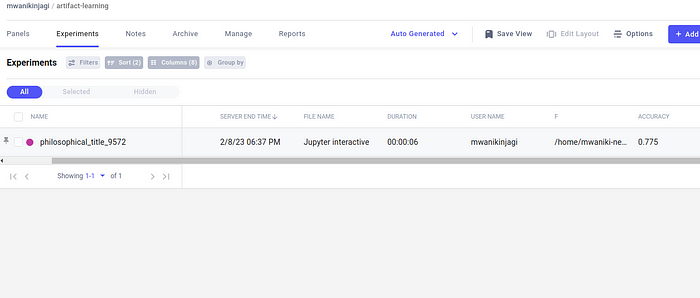
Our project named “artifact-learning” will appear as seen above. On opening it, we will see the page below:

After clicking “philosophical_title_9572” (the randomized name of our experiment), we will see the following page:

Here we can see everything important that we would require such as hyperparameters, metrics and even the system metrics. Additionally, we can see that the accuracy we were looking for had been successfully logged.
We then combine our “X_train_transformed” data with the corresponding “y_train” data in order to have a complete dataset that has all the nuanced information we will require in future.
#recombining the dataset
X_train_transformed["Survived"] = y_train
print(X_train_transformed.head())

The screenshot shows our added column at the bottom named “Survived.”
We then make this into a csv file that will be uploaded to the “Artifact” page as the first version.
#Making csv file
X_train_transformed.to_csv("Desired path in local computer")

#Naming Artifact and adding csv file
artifact = Artifact(name="Titanic_data",artifact_type="dataset")
artifact.add("Location where csv was stored")

experiment.log_artifact(artifact)

#End experiment
experiment.end()
After receiving a message that indicates success, you can now go to your Comet homepage where the Artifact is found.


We can inspect that dataset to see if it has the data we seek and if every operation has been successful.

On performing a quick check, you can see that all the columns and data are available as we desire.
Wrap Up
In this article, we have successfully demonstrated that developing a dataset for a model could be additionally systematic and orderly. Here, we have been able to keep track of the model performance on a given dataset version that we also kept track of. Comet offers practitioners the opportunity to automatically and programmatically keep track of datasets which reduces the need to manually perform tasks and ensures higher efficiency.
Performing an iterative process using the same methods employed here will keep a data practitioner up to date with the exact steps they performed to arrive at certain conclusions and performance as every important step will be documented and stored in Comet ML’s workspace.
In a business setting, it’s crucial to keep a meticulous record of the datasets one has. Versioning these datasets according to the changes that have been made along the way ensures that increments in the improvement of predictive models become easily traceable. Comet Artifacts make model versioning easy and the visual interface one can access through Comet’s website is unparalleled in its ease of use and navigation.
Good luck with your next project with Comet ML!


