An End-to-End Guide to Using Comet ML’s Model Versioning Feature: Part 2
In the first part of this article, we made a point to go through the steps that are necessary for you to log a model into the registry. This was necessary as the registry is where a machine learning practitioner can keep track of experiments and model versions.
The next step that I will address in this article involves the development of different models. Additionally, they will have a better performance than the one that had initially been logged. It is necessary as one can easily trace where performance increases and performance drops occur.
Workflow
The workflow will primarily be derived from what we did in the previous article. If we have a better-performing model than the previous one, we can keep it to improve the performance on test datasets. There will be no additional libraries and requirements. To review part one of this series, or to set up your environment for this workflow, check out my article below:
An End-to-End Guide on Using Comet ML’s Model Versioning Feature: Part 1
First-time project and model registration
heartbeat.comet.ml
Steps that we will follow:
- Evaluating the performance of different models.
- Setting up an experiment in our project and using its path to come up with a newer version of our model in the model registry of the initial model.
- Naming our new model and seeing how we can interact with it.
Comparing model performance
Different models offer varying levels of performance on a given dataset because of their inherent strengths and weaknesses. Sometimes this is a good thing as it may be beneficial to the outcome that a data scientist or machine learning practitioner may desire.
Let’s get to the code:
import numpy as np
from sklearn.model_selection import cross_val_score
from sklearn.neighbors import KNeighborsClassifier
from sklearn.tree import DecisionTreeClassifier
from xgboost import XGBClassifier
from sklearn.neural_network import MLPClassifier
from sklearn.model_selection import StratifiedKFold
from sklearn.linear_model import LogisticRegression
from sklearn.ensemble import RandomForestClassifier

#Passing all the algorithms in a dict
models = { 'knc' : KNeighborsClassifier(),
           'dtc' : DecisionTreeClassifier(),
           'xgc' : XGBClassifier(),
           'mlp' : MLPClassifier(max_iter=1000, random_state = 0),
           'lr'  : LogisticRegression(max_iter=500),
           'rf'  : RandomForestClassifier()
         }
#Function to calculate the cross validation score
def cross_val_eval(model, X, y):
    cv = StratifiedKFold(n_splits=5, shuffle=True, random_state=5)
    cv_scores = cross_val_score(model, X, y, cv = cv, scoring='accuracy', n_jobs=-1, error_score='raise')
    return cv_scores

#passing the model_dict function into a variable
models = model_dict()

#Performance evaluation
results, names = list(), list()
for name, model in models.items():
    scores = cross_val_eval(model, X, y)
    results.append(scores)
    names.append(names)
    print('%s %.5f (%.3f)' % (name, np.mean(scores), np.std(scores)))
The above code evaluates the performance of different algorithms that are in the dictionary and the result is shown below:
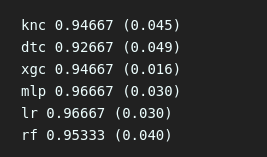
From the above image, the best-performing algorithms are MLPClassifier and Logistic Regression as they have the highest accuracy and the same standard deviation.
Picking either of them could allow for a better-performing model in comparison to the one that we had in the previous article. So I will pick the MLPClassifier algorithm for the next model.
2. Setting up an experiment and registering the model
As we are performing model versioning then we need to make sure that all of our experiments are in the same Project and models in the same Registry.
From the first article, we have our Project named model-tracking where we ran an experiment with our first project that Comet automatically named intact_silo_3082.
Your project view should look as follows:
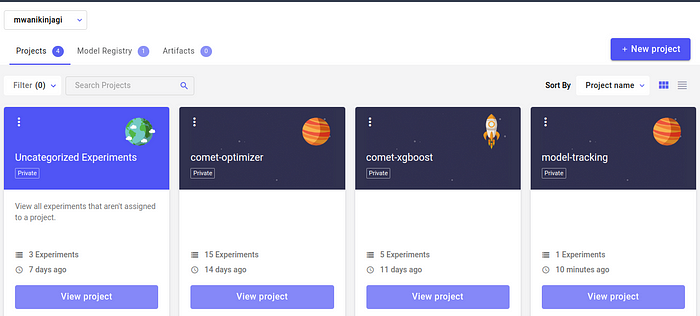
When we click the “View Project button” (under “Uncategorized Experiments), then we will see our only (previous) experiment:
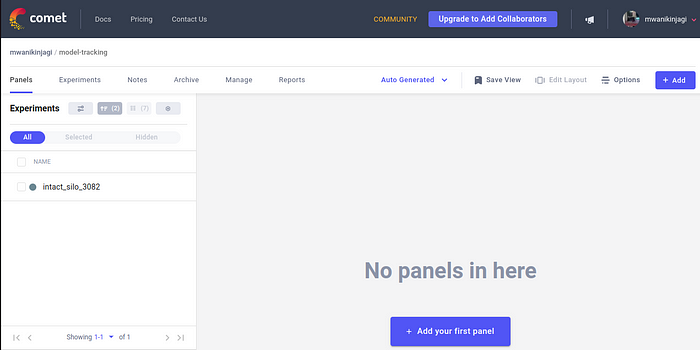
Our objective is to add a new model to the registry so the first step would be to ensure we have it running as an experiment in the above project. So we will write our code as follows:
#our new better performing algorithm
model1 = MLPClassifier(max_iter=1000, random_state = 0)

#fitting model
model1.fit(X, y)

#exporting model to desired location
dump(model1, "model1.joblib")
The next step would be to import Comet ML’s library to log the experiment under this project.
from comet_ml import API, Experiment
experiment = Experiment()
api = API()

#naming the model "model1" and highlighting where it is stored in the computer
experiment.log_model("model1", "/home/mwaniki-new/Documents/Stacking/model1.joblib")
experiment.end()
Make sure to end your experiment with experiment.end() to prevent it from running perpetually and to finalizing all logging to the UI.
After we run the above code, we will have a new experiment logged and now we can use its path to register a new version of our model in the model registry.

In the above screenshot, our new experiment is named intact_krill_7478 and when we click it, we’ll be able to copy the path from the top.

We will then use the above path to register the new version of our model after copying it.
3. Adding the model to the registry

Our model will already have version 1.0.0 that we made in the previous article. We will now add our newer version and name it 1.1.0 and view it from this page.
experiment = api.get("mwanikinjagi/model-tracking/intact_krill_7478")
experiment.register_model(model_name="model1", version="1.1.0")
experiment.end()
In the above code, we add our newer version model to the “model1” page that we have in the registry. The first action performed is pasting the path copied above into the “api.get()” method.
We then specify the model_name as “model_1” and name it “1.1.0”. The model registry page should then appear as it is below:

We can now see that the model has two versions. The next step would be to click “View Model.”
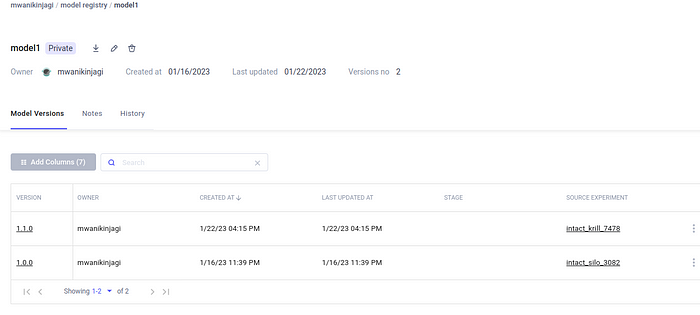
The above screen appears. We can see our first and second models and their version names. On the far right, we have their source experiments that appear on the Project page.
Additionally, anyone with access to the workspace can download the models and begin utilizing them as it has already been uploaded to the registry.
Wrap up
This marks the end of the two-article series explaining how someone can track a model and its development using Comet ML. We have demonstrated that it is possible to develop a better model and keep track of its versions through the entire development process.

